Table of Contents
Shopify is a platform with a lot of flexibility, and one of the ways you can customize your store is with CSS.
CSS (cascading style sheets) is a code language that tells web browsers how to style and format HTML elements.
Shopify’s default themes are already pretty great, but sometimes you might want to make some changes to make your store stand out.
That’s when Shopify custom CSS becomes a good choice!
Maybe you want to change the color of your themes, add a custom font, or remove Powered by Shopify from the footer… Whatever your vision is, CSS can help you make it a reality.
We’ve found a few ways you can add Shopify custom CSS to your theme. Let’s see which they are, and which is the best and least difficult option for you.
Sounds good? Let’s go for it!
What is the best way to add Shopify custom CSS?
The Shopify platform is known for its large variety of store themes, both free and paid. This is one of its biggest strengths, as it allows store owners to find a theme that perfectly suits their needs. However, sometimes you may need to slightly adjust the layout or change the colors.
For some of these changes (especially the advanced ones), you will need to custom the CSS file of the theme. You can also use custom CSS to edit the design of the third-party apps installed on your store. This flexibility and customization are one of the reasons why Shopify is such a popular eCommerce platform.
So, let’s take a look at the 4 options below to know which is the best to add Shopify custom CSS to your theme and make your store stand out from others.
Option 1: Edit the Shopify theme design
If you want to make changes to your website that are more than just cosmetic, you might want to consider editing the CSS for your Shopify theme. CSS is the code that controls the look and feel of your website, and by editing it, you can make changes that will be applied across your entire site.
But here, we have a more comfortable way to edit your theme, and that is the built-in theme customizer.
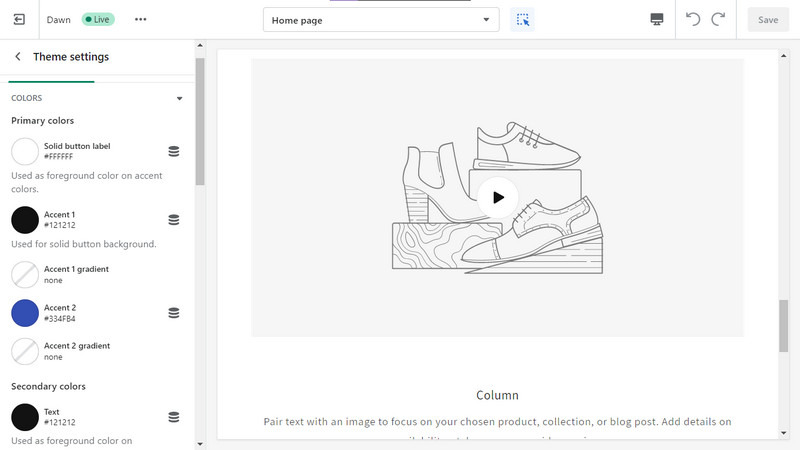
The built-in theme customizer is a great way to change standard things without having to edit the CSS.
The built-in theme customizer is a great way to change standard things like colors, fonts, and some layouts without having to edit the CSS. It offers a variety of options depending on the theme you are using, so you can usually find what you’re looking for. Plus, it’s a lot easier to use than CSS, so it’s worth checking out if you’re not sure how to add or edit CSS.
Additionally, one downside of editing CSS is that your adjustments will be lost if your theme is updated. Except if you’re using a theme with an advanced theme updater, which not many themes have.
Due to this, make sure to back up your code so you can apply it again after a new update whenever you make CSS changes.
Option 2: Add or edit Shopify custom CSS through your theme editor
This is the most common and the least difficult option that we are going to discuss in this article.
The main character is to add or edit the CSS directly in the existing CSS file located in the Shopify theme code. This file is usually called theme.scss.liquid or base.css in the new Shopify 2.0 themes (i.e., Dawn).
You can find it by going to your store admin > Online Store > Themes > Actions > Edit code > Assets folder.
Once you open up the CSS file, you can edit or add any CSS you want.
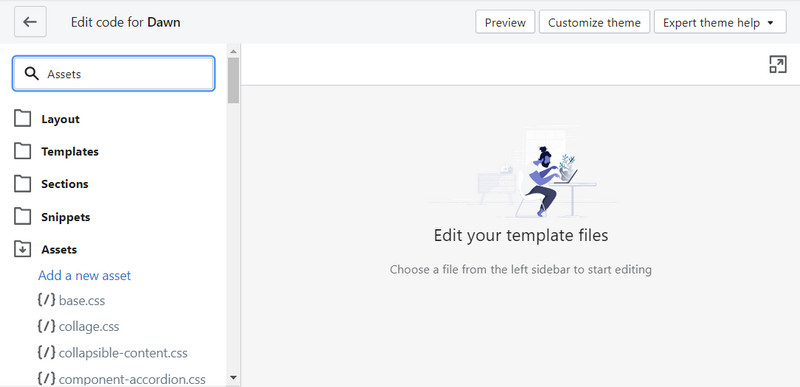
The most common and the least difficult option is add Shopify custom CSS through your theme editor
However, one disadvantage of this method is that if you change or update the theme, your custom CSS will be lost. Therefore, it’s a good practice to put all your customizations in a section called “Custom CSS” or something similar to avoid losing your CSS. Then, you can just copy and paste it into the new theme if you need to.
So, how to do option 2?
Don’t worry, we will mention it in the following section.
Option 3: Create a new Shopify custom CSS file
Creating your own CSS file is a great way to customize your shop’s look and feel. By creating a new CSS file, you can easily connect your CSS file to your theme. This way, if you update or change your theme, you won’t have to worry about losing your customizations.
To create your own CSS file, go to the store admin, then Online Store > Themes > Actions > Edit Code. In the Assets folder, click on Add a new asset. On the pop-up, select Create a blank file and name it whatever you want.
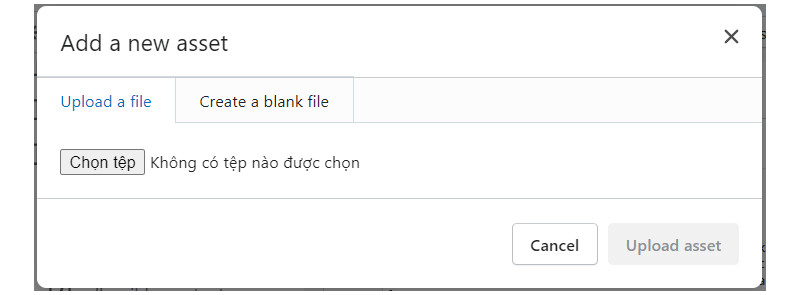
By creating a new CSS file, you can easily connect your CSS file to your theme
When you have read this far, you will probably understand that this option is similar to option 2.
Indeed, both ways have a similar implementation, but they are different in the title. You can add/edit or create a new Shopify custom CSS through the theme editor.
Therefore, we have combined these options so that you can flexibly choose the right option according to your needs.
Option 4: Add or edit the Shopify custom CSS via a third-party app
The last method for adding custom CSS to your Shopify store requires the installation of a third-party app. While this may seem like an extra step, it actually provides a big advantage.
All the custom CSS entered into the app is independent of your current theme. In other words, you can change or update themes as you like without affecting your custom CSS. There are a few apps that offer this functionality, and some of them are even free.
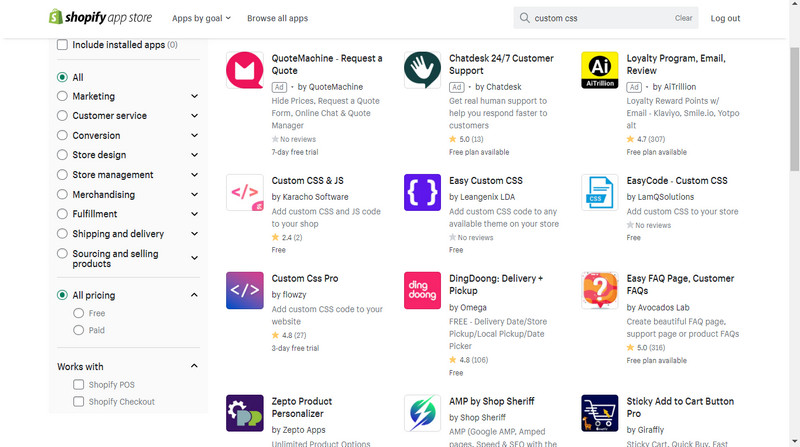
Add Shopify custom CSS via a third-party app may seem like an extra step, it actually provides a big advantage.
The only downside is that every app has some impact on the store’s performance. Especially if the CSS is loaded via a different file. So, you need to consider carefully which way is the best for your store before making a decision.
Overall, the best way to add custom CSS to your Shopify store is through the theme editor. The theme editor is a code editor built into the Shopify platform, where you can make changes to your store’s code.
Tweaking the code sometimes can lead to unexpected results. But, you are not alone, even CSS gods make mistakes.
Just remember, when making changes to your code, it’s always a good idea to create a backup of your theme first. That way, if something goes wrong, you can always revert to the original.
Back up your Shopify theme
As mentioned earlier, adding Shopify custom CSS to your store could be a complicated process. First, you should find out if there is any other way to edit your Shopify Theme without editing CSS.
Using a store builder app or an advanced customizable theme might do the trick. This will allow you to revert your shop to its current state if you make any mistakes.

it’s always a good idea to create a backup of your theme first
But even CSS experts make mistakes. How can you be confident that you are not making any mistakes when adding Shopify custom CSS to your store?
So, if you have any reason to believe that you might inadvertently make an error in your CSS, we strongly advise backing up your store.
This way, when anything goes wrong, you just need to go back and don’t have to start from scratch.
A quick guide to backup your Shopify theme in just 2 steps
To back up the Shopify theme of your online store, you can follow these 2 simple steps.
Step 1: Negative to your Theme Page
To begin, you need to log into your Shopify Admin, go to “Online Store” in the left toolbar, and click on “Themes” from the dropdown.
It would then take you to the Theme page by default.
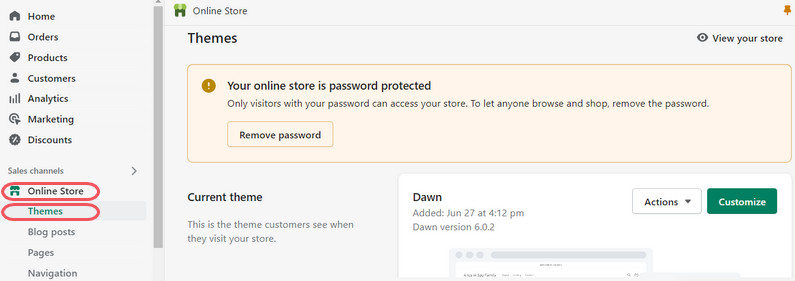
it’s always a good idea to create a backup of your theme first
Step 2: Make a copy of the current theme
On your Dawn, click on “Actions” then choose “Duplicate” from the dropdown, and you have finished backing up your Shopify theme.
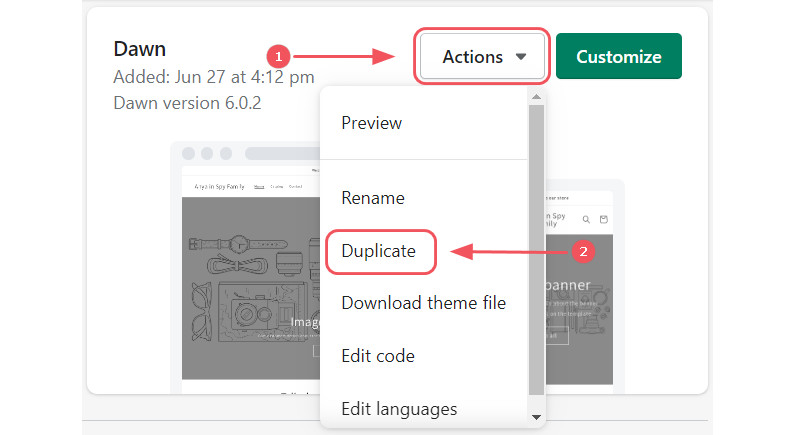
Click on “Actions” then choose “Duplicate”
Once you’ve done, the duplicate theme will appear on the Themes page. It is named Copy Of + the name of the theme that you duplicated.
In case you don’t want this name, you can rename it by clicking on “Rename” from the Actions button.
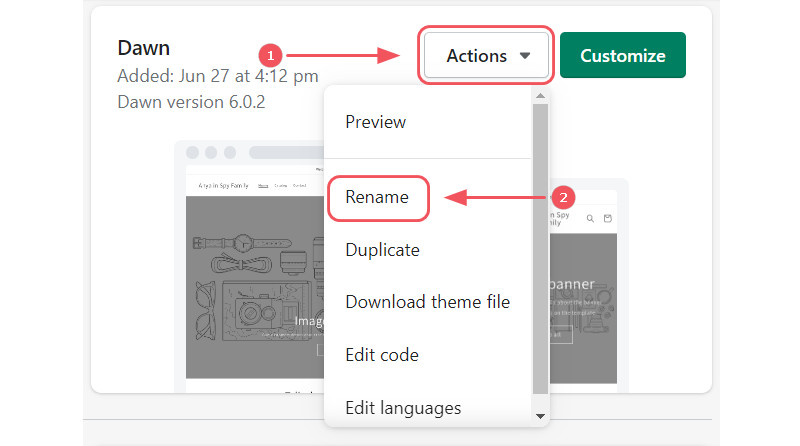
Click on “Rename” from the Actions button
Great! Now you know how to backup your theme. I’m pretty sure that you are ready to jump into any other actions to your current theme.
How to add Shopify Custom CSS to your theme
First, let’s learn how to edit Shopify Custom CSS in step 1 and then we move on to add custom CSS in step 2.
Step 1: Edit your Shopify Custom CSS
Editing the CSS inside the existing CSS file located in the theme code is the most common way to edit CSS. You can find it by going to your Shopify admin > Online Store > Themes > Actions > Edit code > Assets folder.
You will see a file under “Assets” which is usually called theme.scss.liquid or base.css in the new Shopify 2.0 themes (i.e., Dawn). From here, you can start to edit your Shopify Custom CSS.

Shopify admin > Online Store > Themes > Actions > Edit code > Assets folder.
Plus, if you’re looking for a quick and easy way to edit your CSS file, you can look no further than your own personal stylesheet.
This method is straightforward, and it’s easy to keep track of all the changes you’ve made. However, the downside is that it’s not as full-proof as some of the other methods out there.
If you’re looking for a long-term solution, you might want to consider adding your own custom CSS. This will make it a lot easier to keep track of all the custom code you’re adding, but it will be a bit harder to set up.
Step 2: Add a Shopify custom CSS file
To add a Shopify custom CSS, you will have to click on “Add a new asset” under the Asset folder shown below.
From here, you will see 2 options: “Upload a file” or “Create a blank file.”
Click “Create a blank file” and name it whatever you want (for example, custom.css).
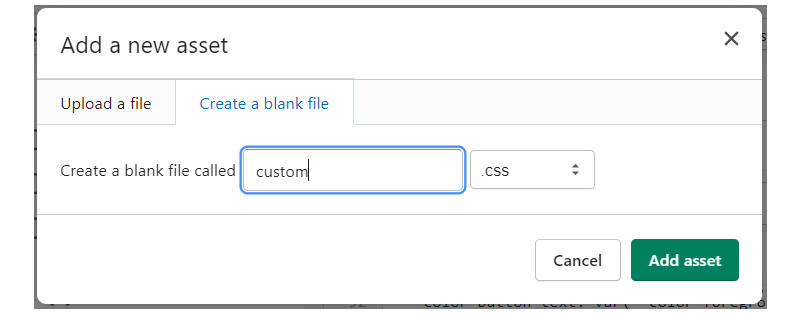
Click “Create a blank file” and name it whatever you want
Once you have the new CSS file created, you can add your custom CSS.
The important part is to “call” from your theme, so it’s used. To do so, go to the Layout folder and open a file called theme.liquid.
Add the following liquid code to the <head> section where “custom.css” is the file name of your custom CSS file. Once you have updated or changed your theme, you need to copy this code to the file theme.liquid again.
Now navigate to your theme.liquid using the search bar.
Click on the file to open it, and locate a line that looks similar to this code below:
|
<link rel=”stylesheet” href=”{{ ‘component-predictive-search.css’ | asset_url }}” media=”print”onload=”this.media=’all'”> (the easier way is to Ctrl + F and enter ”stylesheet”) |
Underneath this line, paste this code to your theme.liquid file:
|
<link rel=”stylesheet” href=”{{ ‘custom.css’ | asset_url }}” type=”text/css”> |
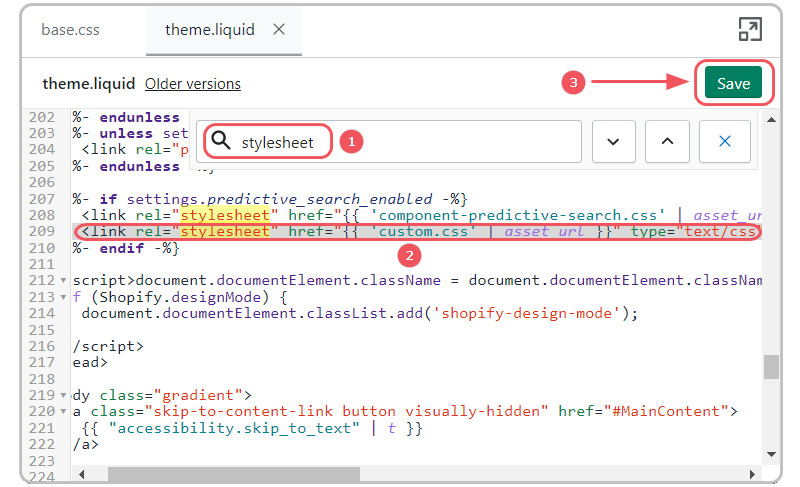
paste this code to your theme.liquid
Keep in mind that the file name needs to match the name of the CSS file that you just uploaded
Your CSS file will remain in your assets folder, even if you switch themes. You’ll just need to copy this code into your new theme’s theme.liquid file.
Great! No more steps and you finally know how to add or edit your Shopify custom CSS!
Final thoughts
Shopify themes are already styled for you, but you may want to customize your store even further by adding your own CSS. This can be a great way to really make your store stand out from the crowd and give it that extra bit of personality that you’re looking for.
If you’re not sure how to add Shopify custom CSS to your store, several online resources can assist you in getting started with this article.
Once you’ve added your CSS, you will be able to fine-tune your store design until it’s exactly what you wish for. So if you’re looking to take your store to the next level, don’t be afraid to experiment with some custom CSS.
Hey, want to know more about OneCommerce? CHECK IT OUT!


