Table of Contents
It is surprisingly simple to start selling on Shopify‘s user-friendly platform. If you have an existing business or a concept for a new one, Shopify is the perfect tool to offer your wares everywhere.
OneCommerce.io will outline 10 straightforward steps to let you know how to sell on Shopify, and provides helpful advice to get you started.
Shopify overview
Before we explore selling on Shopify’s guides. Let’s learn more about Shopify.
What is Shopify?
Shopify is a web-based E-commerce platform hosted by a third-party provider that can accommodate businesses of any size. Entrepreneurs may take a while to employ a graphic designer or become accustomed to design software, but this unique online retailing platform has you taken care of.
There is no need to install software or use a hosting service – Shopify provides all the tools to make an online store successful.
| Read more: Shopify Review – Everything You Must Know About |
How does Shopify work?
When selling on Shopify, you will have a comprehensive selection of technology solutions for setting up, designing, operating, and expanding your e-commerce store, with a fee that is billed on a monthly basis. In other words, it requires payment to access this platform.
Shopify offers various pricing options, starting at $19 for the basic plan and going up to $299 for the advanced plan. This will give you access to the admin panel, allowing you to construct a comprehensive e-commerce store from top to bottom.
You can find more details about Shopify in our article related to how Shopify works.
Shopify pricing
Shopify is many companies’ favorite due to its user-friendly interface and low cost of entry. The cost of selling on Shopify varies from $25 per month to $399 per month for its regular plans.
No contracts are necessary and there are no additional fees, apart from those incurred when using an external payment gateway. If you agree to pay for a plan in advance for either one or two years, you can get a better deal.
To give you a clear understanding of Shopify’s pricing, here is an outline of all their tiers:
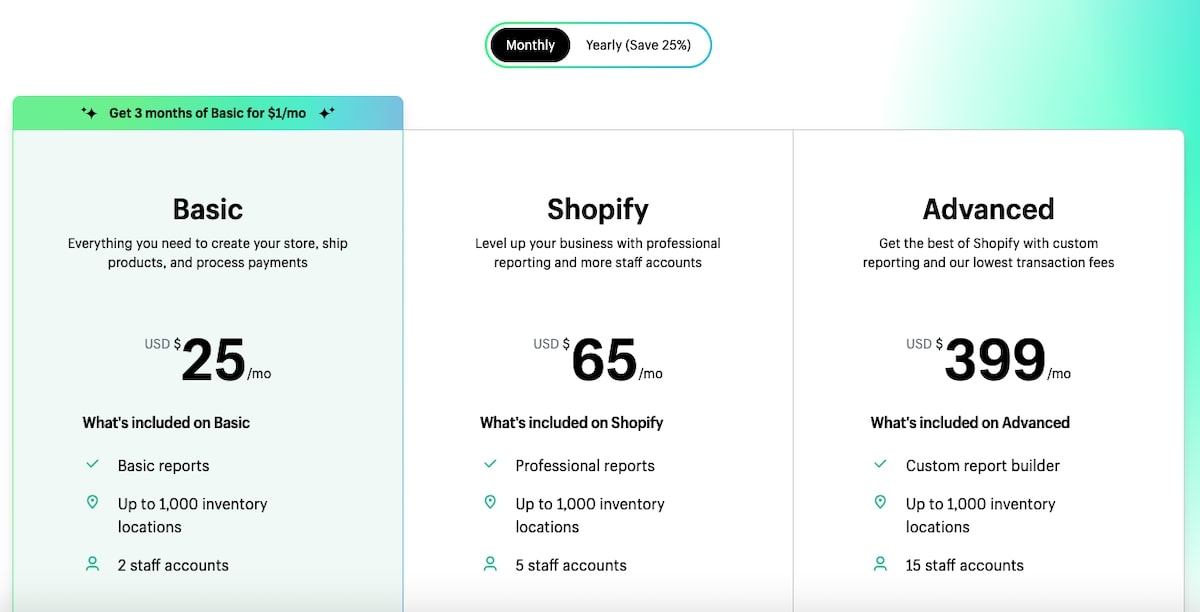
Monthy prices
If you need specific features, select the plan that best fits your needs from the three options. For small and medium businesses, we recommend beginning with the basic plan.
As you progress, you will be able to identify your requirements. Fortunately, you can adjust your strategy later if necessary. Overspending is an issue if the original plan turns out to be too ambitious for your capabilities.
You can switch between plans whenever you want, so there’s no need to hurry into getting the more advanced option.
Beginner’s guide on how to sell on Shopify
You probably have an outline of your business plan, including the goods you intend to offer and the people you are aiming to sell them to in the online market.
It is essential to create a business, obtain the necessary products, and establish your company’s identity before you proceed. And before learning how to sell on Shopify, you may wanna learn how to set it up first.
Without further ado, here’s a straightforward process for selling on Shopify in ten simple steps.
Step 1: Buy a domain
Securing a domain name is a significant step. It’s like having your address on the web. You should make sure it is easy to recall and, most importantly, associated with your business.
When selling on Shopify, you will have a free web address, however it won’t be highly ranked in search engines. The URL appears like this: [yourshopifystore.shopify.com]. The additional downside is that it forces the inclusion of ‘Shopify’ in the URL.
When registering for Shopify, you will be prompted to enter a name for your store, and the platform will generate a free URL based on it. You can modify this once you have signed up by following specific steps:
- Accessing the Shopify dashboard from a desktop computer
- Heading to the Sales Channels area
- Accessing Online Store
- Going to Domains
- Selecting the option to alter the main domain
- Choosing a domain name from the available options
- Clicking Save
Pick a web address that resembles your company name. Your social media accounts should also mirror your business name. This will make it simpler for consumers to discover you online through search engines.
You can obtain a domain name from popular registrars like A2 or GoDaddy. It’s quite easy to do, provided the domain name you want is still available. You must give your payment details for this purchase to be finalized, and then the domain name will be all yours!
Step 2: Select and modify a design template before you sell with Shopify
You can tailor the appearance of your e-commerce shop to your liking. Fortunately, Shopify offers a vast array of free and paid themes.
They are in the list on the left side of the page under Themes.
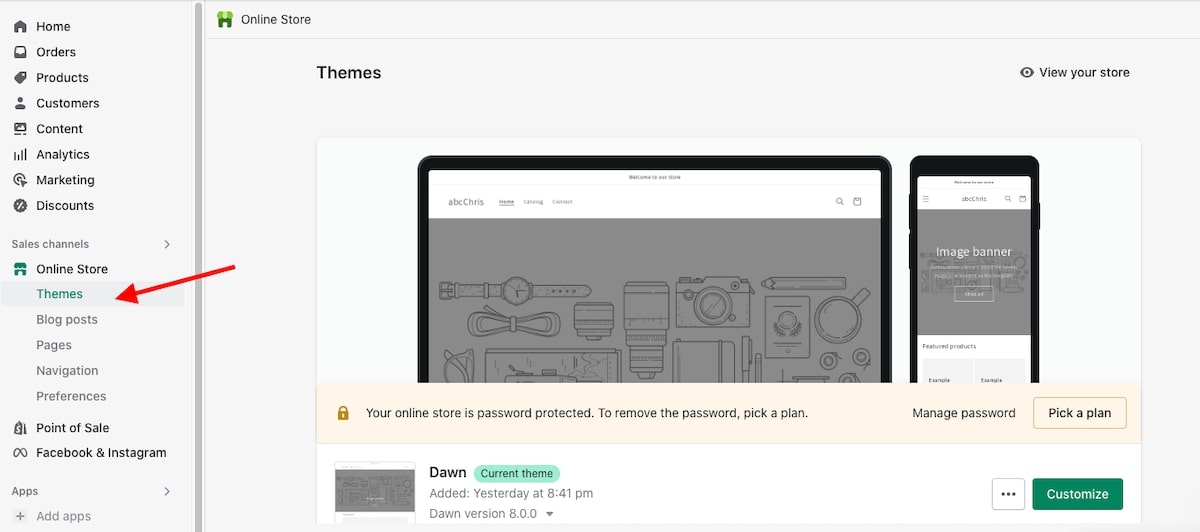
Themes
Choosing a theme for your store is important; it will determine the layout, features, and overall look. Investigate the various themes available to ensure your customers have a great experience.
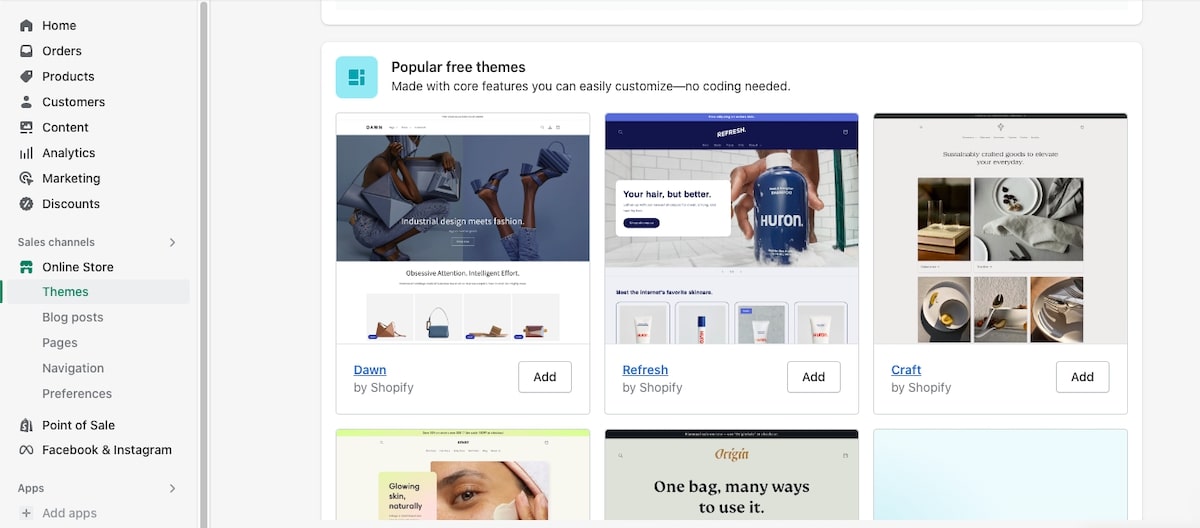
Choose a theme
Once you’ve settled on a theme, you can modify your content, design, and font. If you select the Customize option, it will take you to a page where you can begin personalizing your store and selling on Shopify.
Pay attention to detail while modifying the theme to match your company’s image.
Step 3: Upload your product
Once your Shopify Store theme is up and running, you can add your products using the Shopify Admin area you’ve been using.
- Go to the Products option on the menu located on the left side.
- Press the button to Add products.
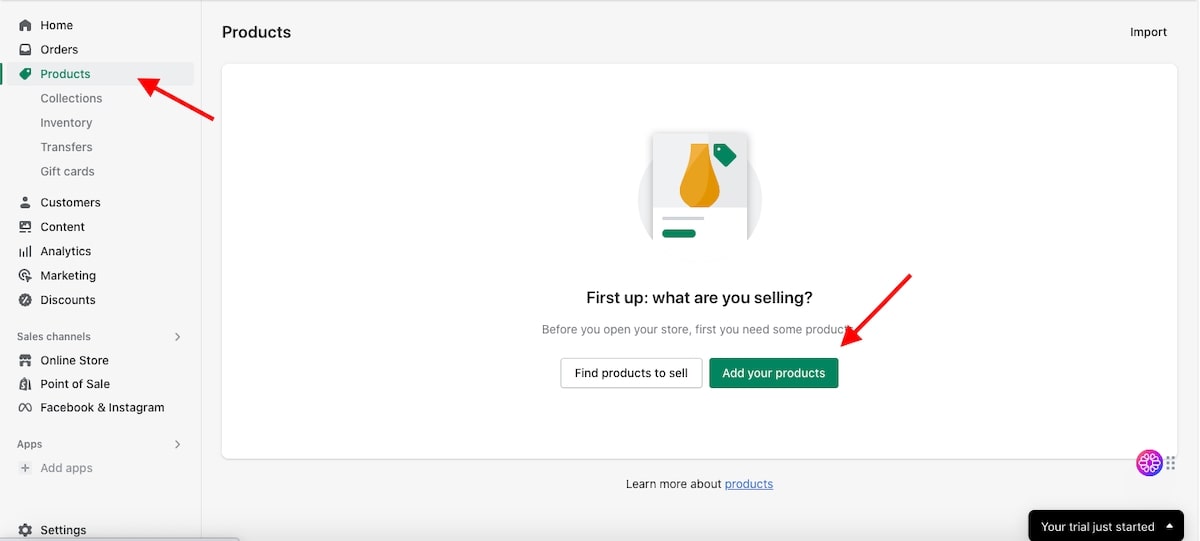
Add your products
- Complete all the details concerning your product and add any pictures.
- Press the Save button.
If you have a large selection of merchandise, entering your inventory manually can be time-consuming. Fortunately, with the aid of a CSV file, bulk uploading your items is simple in four steps:
- Navigate to the Products section in your Shopify store management area.
- Hit the Import button
- Press the “Add file” button, and then select the CSV document containing your products.
- Hit the Upload button and progress.
Maintaining accurate stock levels is an essential element of running a shop. Make sure your product listings are always current to cultivate a long-term successful eCommerce business.
Step 4: Establish forms of payment
When the buy button is pressed, the customer is prepared to complete their purchase. To ensure that no transaction fees are lost, it is crucial to make the buying process as straightforward as possible.
Establish a safe checkout process on Shopify to process orders and payments from your store. When a customer adds an item to their cart, it will be compared with the amount of stock they have in your shop.
If the item is in stock, it will be kept aside for the customer until they finish paying. Head to the Checkout settings section of your Shopify admin to view and alter your checkout options. Include your business banking details so that payment can be transferred.
You can opt to obtain the customers’ email contacts while they are making payment to utilize for email campaigns in the future.
Step 5: Choose a delivery method and set your shipping costs
Before accepting your initial order, you must decide how the product will be delivered to the consumer. There are four primary options available:
- Dropshipping
- Retailer Shipping
- Local delivery
- Local pickup
Dropshipping involves sourcing products from a supplier who stores the inventory and dispatches it when you sell with Shopify. You will purchase the items at wholesale prices. However, you get to decide what price to set for customers on your website.
Dropshipping is favored for eliminating inventory expenditures such as storage fees or discarded items. Your supplier stocks your products in their warehouse, and you only buy what is necessary from them. The supplier will also send out the products to your buyers.
It’s an attractive option for new entrepreneurs due to its low start-up costs; however, it does come with certain disadvantages.
When using a dropshipping model, you cannot determine the available stock quantity. If your supplier experiences a shortage, it is your responsibility to find a solution.
You will not have much power over how your products are labeled, as it is up to the supplier. Furthermore, you won’t be able to manage the shipping process either; your dropshipper may split one order of multiple items into several shipments, resulting in an additional shipping charge for each item.
Alternatively, you can opt to manage the shipping process yourself. This will give you full authority over how your items are packaged, shipped, and presented. If having a well-crafted experience from start to finish is a cornerstone of your brand image, then this could be the ideal option for you.
Retailers must put in more effort when it comes to shipping than when dropshipping. They need to package their own items, utilize a delivery service like DHL or FedEx, and make sure they account for the cost of shipping in their online business plan.
Local delivery and collection are fairly uncomplicated. You’ll still need to wrap your goods and stay organized with your stock when you are selling on Shopify.
When delivering locally, obtain the addresses of customers and either personally deliver their packages or hire a local courier service. For in-person pickups, provide customers with straightforward instructions on how to collect their items from you.
On the left-hand side of the menu bar, you can include Pages, Navigation, and Preferences. In the Pages section, you can add any additional website pages that your customers may find interesting, such as a company description in an “About Us” area.
Under Navigation, it is important to ensure that the menus on your shop are easy for visitors to understand. Poor user experience can quickly discourage users from using a website.
Verify that your Shopify Store is prepared for Search Engine Optimization by configuring the Preferences section. Input your website’s title and meta description in this area.
The Search Engine Response Page (SERP) will display this information when individuals look up your business. Google and other search engines also use this to relate queries to your store, so make sure you incorporate pertinent keywords.
You can connect your Google Analytics and Facebook Pixel accounts to gather user information on this page. Towards the end of the page, you will find a box indicating that your website is Password Protection.
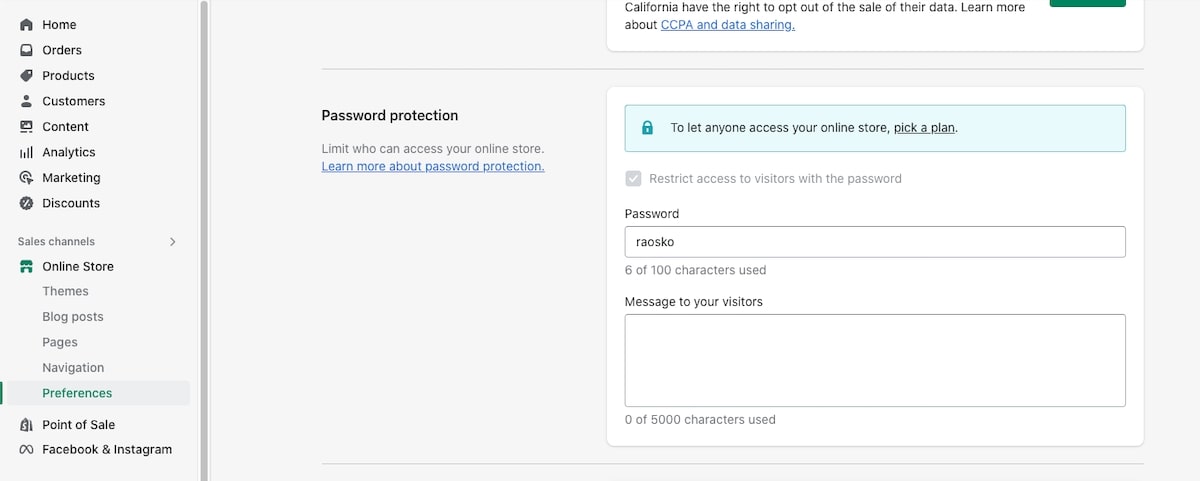
Type your password
Once you have finished preparing your store for launch, remove the password protection and select a subscription plan.
Step 7: Go live
If you’re unsure which Shopify plan to choose, go to the Home page on the left-hand side of your Shopify Admin. At the top of the page, select “Pick a plan” to get started. It’s a straightforward process that makes it simple to make payments.
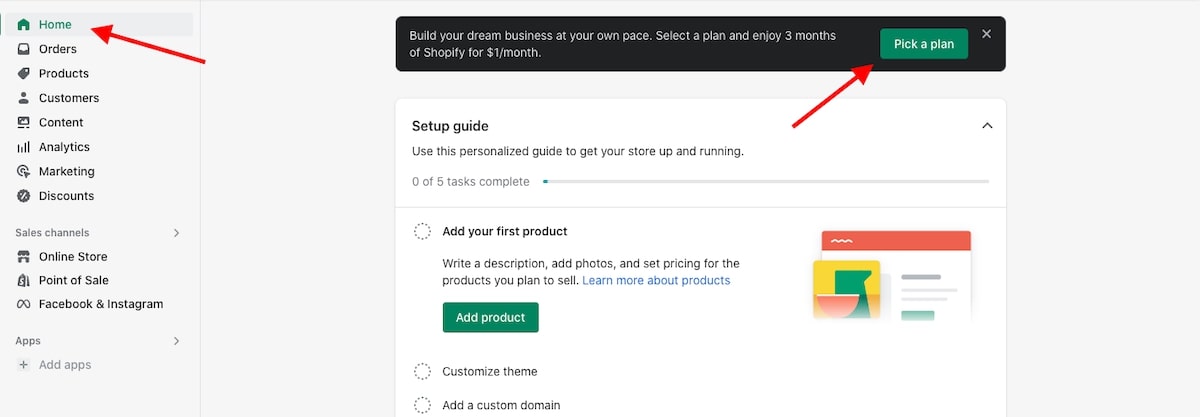
Pick a plan
Pick up your best-fit option.
Step 8: Connect your store to your social media accounts
If you want to connect your social media profiles to your Shopify store, pick a theme that already has them included. These themes can be found by searching for “social media” in the Theme Store.
To see if your current theme supports the feature, go to the bottom or side of your page, then in the right-hand menu, head over to the Social media icons area and select Enable social media icons.
Step 9: Set up a Shopify chatbot
To integrate your social media accounts with your Shopify store, select a theme that has them already incorporated. You can identify these themes by looking for the term ‘social media’ in the Theme Store.
You can also determine whether your current theme supports the feature by going to the footer or chosen area, then selecting the Social media icons section on the right-hand side menu and activating it.
Step 10: Connect Hootsuite to other systems.
Making your store’s operations simpler is achievable with Shopview. Connecting it to Hootsuite will enable you to quickly spread the word about any products available in your shop over social media platforms.
Selling on Shopify: Frequently Asked Questions

What types of items can I sell with Shopify?
Shopify allows you to offer items and services (whether physical or digital) as long as they abide by the platform’s standards and are not unlawful.
Shopify is committed to fostering a space where the free expression of ideas and goods is allowed.
Expressing the idea that exchanging goods and services freely is an essential principle of commerce, Shopify clarifies that certain activities don’t align with its goal of making business better for everyone.
Activities such as the mistreatment of children, use of illicit drugs, and support for terrorist groups are prohibited. If you’re looking to make money from things like pre-made social media plans or your grandmother’s homemade pies, you should be okay unless Grandma uses some unusual ingredients.
What are the benefits of selling on Shopify?
Shopify is a popular eCommerce platform due to its range of cost-effective solutions for businesses of any size and the straightforward back end. It’s an attractive choice for store owners regardless of their level of technical skill.
It’s well-suited for entrepreneurs looking to expand their operations. It offers a range of digital resources that can be incorporated into the shop, such as chatbots that handle customer service requests.
How much does Shopify charge per sale?
Shopify has five different payment options. The Shopify Starter plan is $5 monthly and provides access to limited business resources. The Basic Shopify package is $25 a month, while the regular Shopify option costs $65 each month. Lastly, the Advanced Shopify plan comes at the cost of $399 per month.
All programs provide an internet store and access to all sales networks. The higher-level plans come with lower transaction fees from Shopify Payments, greater discounts on shipping costs, and more sales and management features.
Is it a good idea to sell on Shopify?
Individuals looking to begin an online business should pick the most suitable option for their financial resources and timeline.
Shopify offers a comprehensive e-commerce solution that enables new entrepreneurs to construct, manage, and expand an online business without being concerned about web hosting or upkeep.
Steve Benjamins of Site Builder Report accurately summarizes Shopify’s success in his introduction to their review, stating that prior to ten years ago, there was no clear champion in the eCommerce space until Shopify came on the scene.
Shopify has made a name for itself through its user-friendly software and inventive features. Nowadays, it is the most prominent player in the field and the top choice for creating an online store.
Suppose you’re searching for a dependable and user-friendly platform with numerous connections to other marketplaces, enabling you to offer goods through various sales outlets. In that case, Shopify is an ideal solution.
Before creating an actual store, it may be beneficial to do some research and take advantage of the 14-day trial period to become familiar with the platform, despite some drawbacks, such as a lack of features, SEO tools, and application expenses.
What is the process for new sellers to get started on Shopify?
Shopify does not require any knowledge of coding or technology for those who are just starting out building their store, though they may need to take some time to get used to the platform.
Shopify provides plenty of assistance for those starting out, with various options for asking questions and sorting out issues. In addition, you can contact their support staff through email, chat, phone, a discussion board, and the comprehensive Help Center on their website.
Is it possible to earn a profit through Shopify?
In short, the answer is: yes. If your objective is to make your wares accessible online simply or you’re starting an e-commerce business, the endgame of establishing a Shopify store would be to generate revenue.
Is it a good idea for small businesses to sell on Shopify?
Selling on Shopify is an excellent choice for businesses that depend mainly on digital commerce. It offers unlimited product options and makes it straightforward to monitor stock levels.
Additionally, the drag & drop website builder has a user-friendly interface, so you can fashion a unique website independently without employing a designer.
Is selling on Shopify available during the free trial?
Yes. You can set up your Shopify store and start selling on other channels during the free trial period. Nevertheless, you must choose a plan to activate your store, and you won’t be billed until after the trial ends.
Is selling on Shopify available on social media platforms?
You can offer your goods for purchase on your social media pages, such as Facebook, Instagram, and Pinterest. People can look through what you’re selling, so they can make purchases directly from within the apps.
Final thoughts
Selling on Shopify is still one of the best eCommerce software solutions available. It can provide you with all the necessary tools to create a solid online store, including inventory management and order control, in only a few hours.
Shopify has been a great asset to many entrepreneurs, as they don’t need any coding abilities to get started and have been able to construct their stores from the beginning.
This tutorial should provide a good foundation for selling on Shopify, but you may have additional queries as you go through the setup process. Don’t be worried, as you will uncover insights on your own while putting effort into it.
Read more:
- 9 Best Shopify Profit Tracker Apps for Your Business
- Best Ways to Perform Shopify Speed Optimization in 2023
- Go global #4: How to Use Localized Images To Boost Sales?


