Table of Contents
Adding products to Shopify is your very first step in selling on this platform. That affects how customers can access your products and how you get them out there. In this guide, we’ll cover how to add products to Shopify like a pro in 2023 and beyond.
In detail, we’ll walk through instructions on how to add a product, how to upload images and videos, how to use collections, and edit your search engine listing to attract more customers. With these tips, you’ll be able to add products to your Shopify store quickly and easily and get started selling in no time.
Let’s dive right in!
What is Shopify?
Shopify is an eCommerce platform that allows online merchants to create and manage their own online stores. It’s easy to use, secure and reliable, making it one of the most popular e-commerce solutions available today. With Shopify, you can create a beautiful online shop in minutes, and start selling products or services to customers from all over the world.
The best thing about Shopify is that it provides a wide array of features and services to assist you in getting off to a successful start. Shopify has all the tools you need to run a successful online business, including the ability to build unique stores and product pages as well as integrate payment gateways and delivery services.
In addition, developers offer several apps to help people optimize their Shopify store. Whether you’re a beginner or an experienced online seller, these apps can make it easier to manage your store and take it to the next level. They provide solutions for automating tasks like order processing, profit tracking, collecting customer reviews, and even running dynamic promotional campaigns.
All in all, Shopify is definitely one of the best options if you’re seeking a trustworthy and simple-to-use eCommerce platform to launch your online business.
| ?Learn more about Shopify here: : |
How to Add Products to Shopify Store: Step-by-step Guide
You can’t run a business without products, right? Let me show you such an easy-peasy way on how to add products to Shopify.
Step 1. Log in to Your Shopify Account

Log in to your Shopify account
The first step in how to add products to Shopify is logging into your Shopify account. To do this, head to the website and click on ‘Login’ at the top right corner of the page. Then, enter your login details.
If you are having trouble with your Shopify login, don’t worry, we have prepared an in-depth article on Shopify login (for beginners or experienced users)
Once logged in, you will be directed to the “Dashboard,” where all important management tasks and functions can be found. From here, you can find the “Products” tab located on the left side of your screen.
Step 2. Adding Products to Shopify
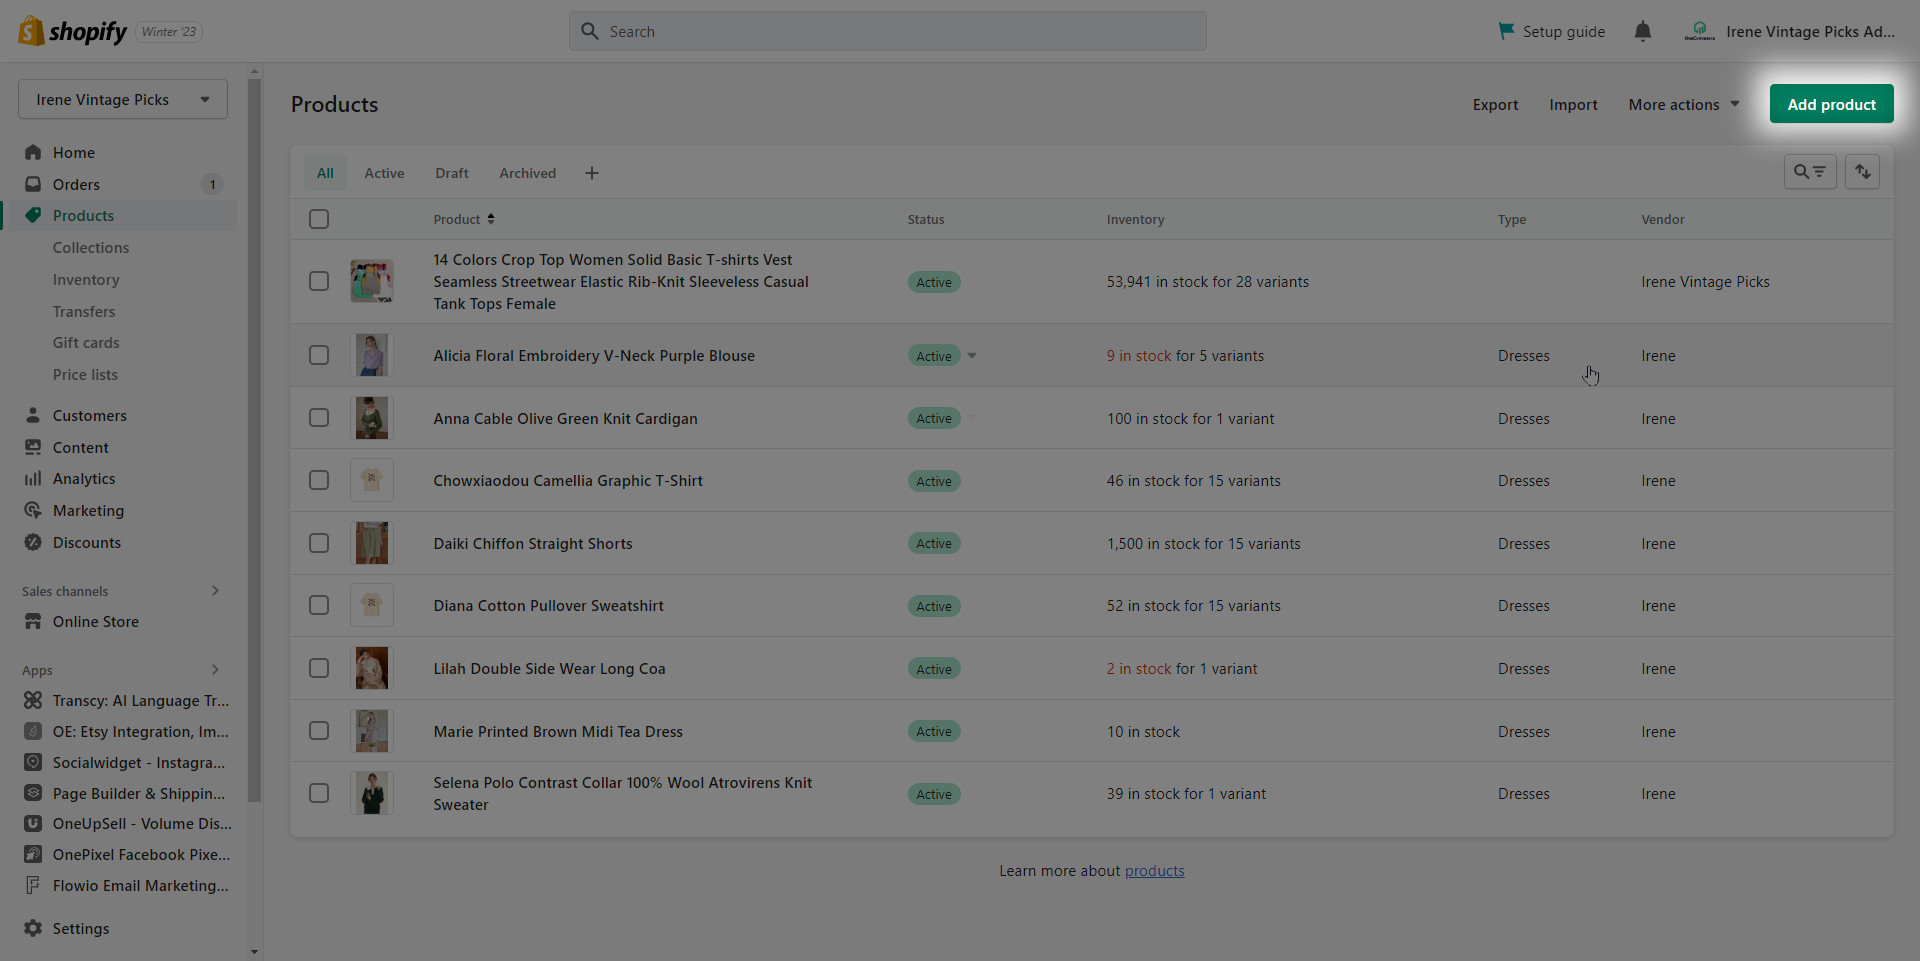
Once you are in the “Products” section, click the “Add Product” button to start creating a new product listing.
You will then be asked to enter the product title, description, images, and price before saving. Make sure you fill out all important information so your customers will be informed and clear about the products they are buying.
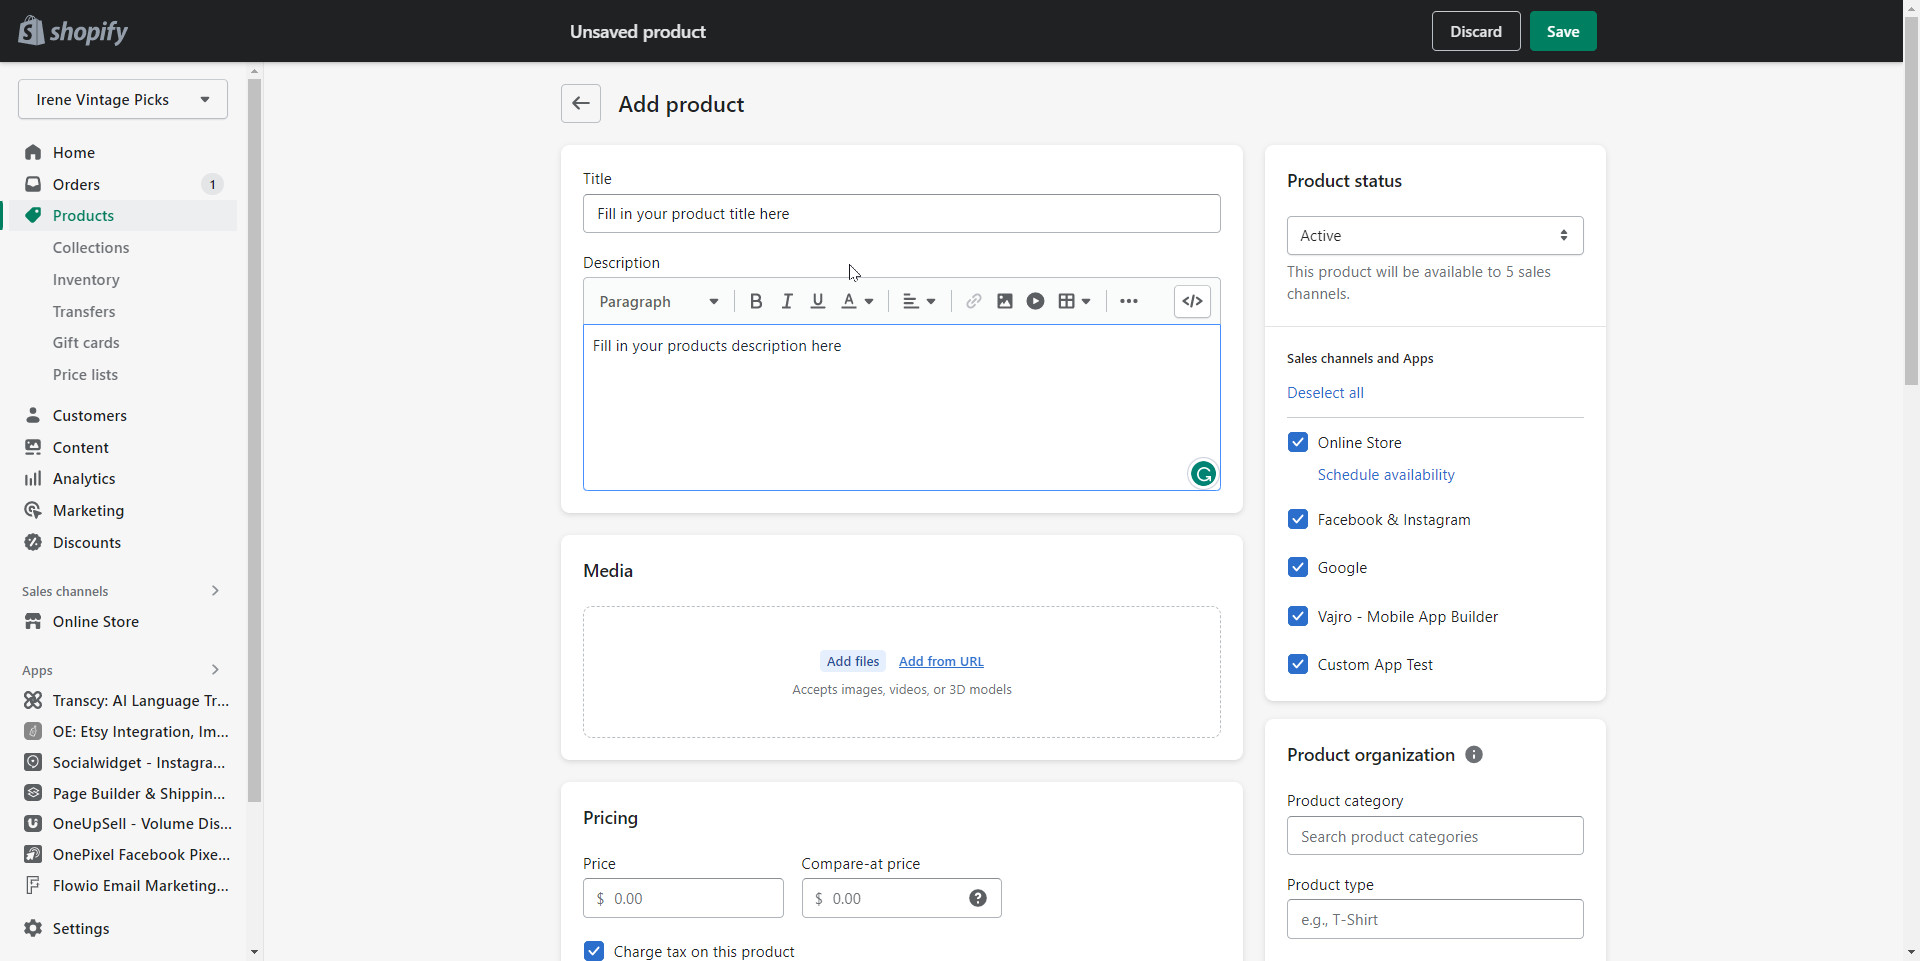
Add your product information
?Here we have some guidelines for you to follow:
| Fields | Best Practices |
| Title |
|
| Description |
|
| Product organization |
|
Step 3. Add Pricing, Inventory, and Additional Information
- Pricing:
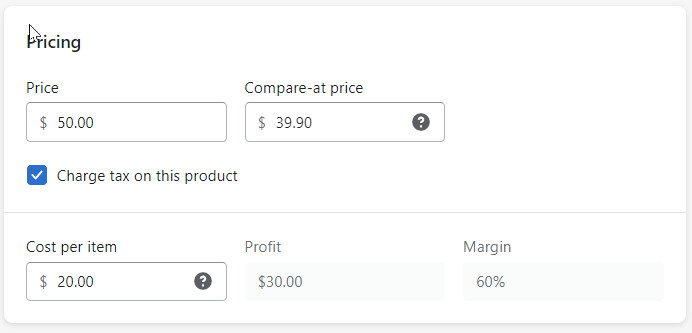
Add pricing to your products
Once you have added your products to Shopify, the next step is to set their pricing. “Price” refers to what you pay for a product at checkout, and “Compare At Price” is the original price of a product before it goes on sale.
| ? For example, if you set $100 as the ‘Compare At Price’ and leave ‘Price’ at $70, the product will be displayed with a discount of $30. In case the product is not on sale, you can leave this field blank. |
The “Cost per item” is where to enter the price you paid the manufacturer for a product, excluding shipping, taxes, and other costs. It allows you to keep track of the cost of the products you’re selling.
Click the “Charge tax on this product” button if the item is taxable.
Setting the correct pricing for your products is to ensure that your customers will get an accurate understanding of how much their order will cost and how much they are saving if any.
- Inventory:
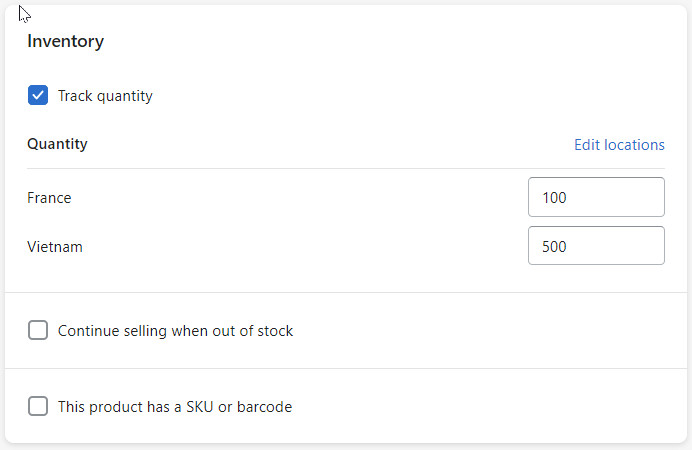
The next step of how to add products to Shopify is to set up inventory
Once complete, scroll down the page until you reach the Inventory section. You can check “Track quantity” to keep track of how much stock you have available. Additionally, you can choose “Continue selling when out of stock” if you are confident in your ability to replenish items quickly.
To finish the product setup process, enter the number of units in stock under “Quantity”. With this information, you can easily add products to Shopify and keep track of how much stock you have on hand.
- Shipping:
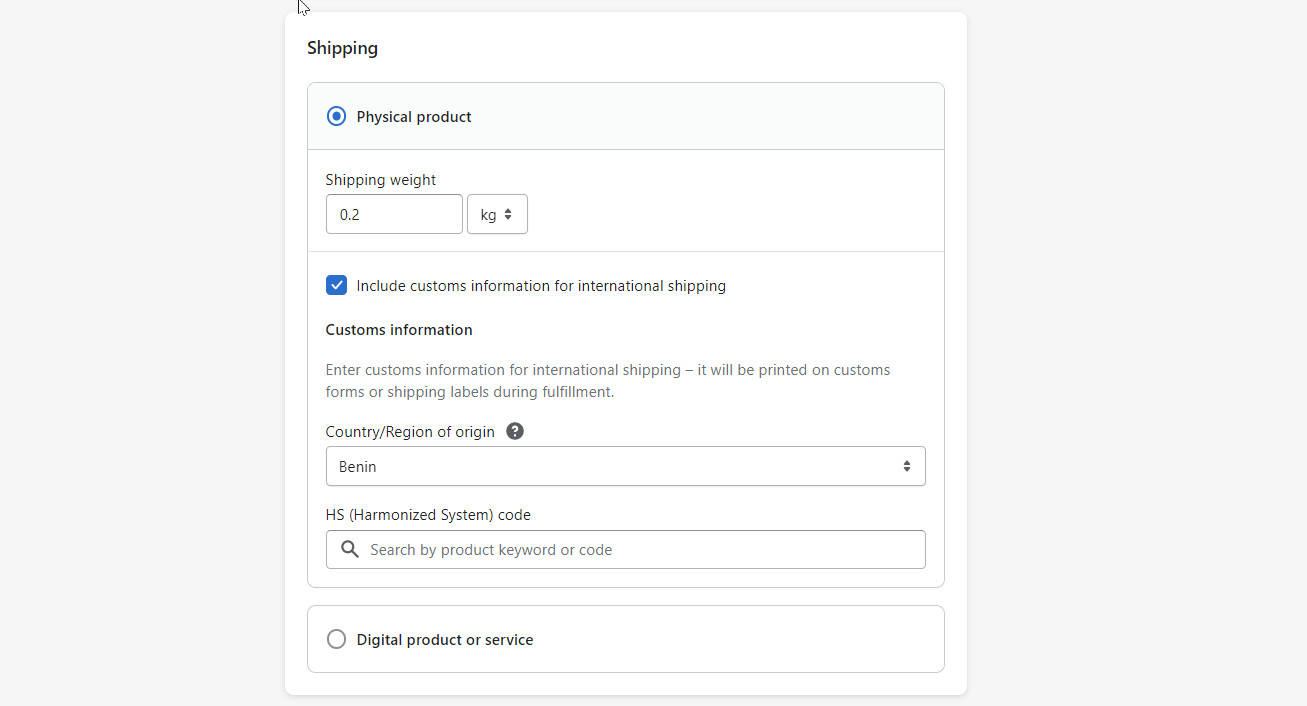
You need to fill in the shipping section if you’re selling physical products
You need to fill in the shipping section if you’re selling physical products.
If you’re selling physical products, you will need to provide shipping information. Under this Shipping section of your product page, you need to tick on the box “This is a physical product”. Then, enter the weight of the product. To ensure that your customers are charged correctly for shipping, you must include the right product weight.
Besides, in the drop-down menu on the right, you will need to choose the measurement that best fits your product: pounds, ounces, kilograms, or grams. If you don’t specify a weight value, then it will be set to 0.1 lb by default.
Step 4. Add Product Image
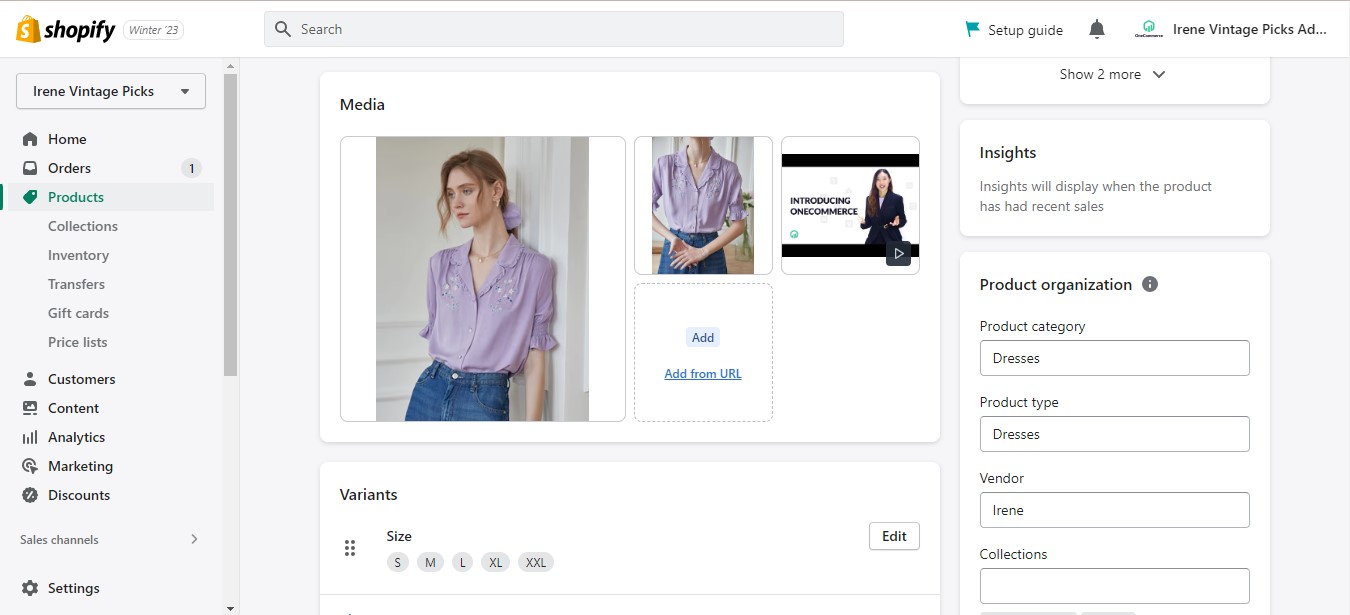
You can create informative and visually appealing product pages by adding product images.
Once you’ve completed your product description and other additional information, the next step is to include images of your product. Product images are essential for giving customers a better idea of how the item looks in real life, as well as allowing them to make an informed decision about their purchase.
When adding images to your product page, it’s important to use consistent formatting so they’re easily found and indexed by search engines. In particular, you should include relevant keywords in the file name, and separate each word with a dash, which will help to improve your SEO ranking.
Furthermore, you should also provide multiple images of the product from different angles, or even show how it looks when being used for maximum effect. That’s because this will give customers a complete representation of the item and help them make a purchase more confidently and quickly.
Step 5. Add Tags and Collections
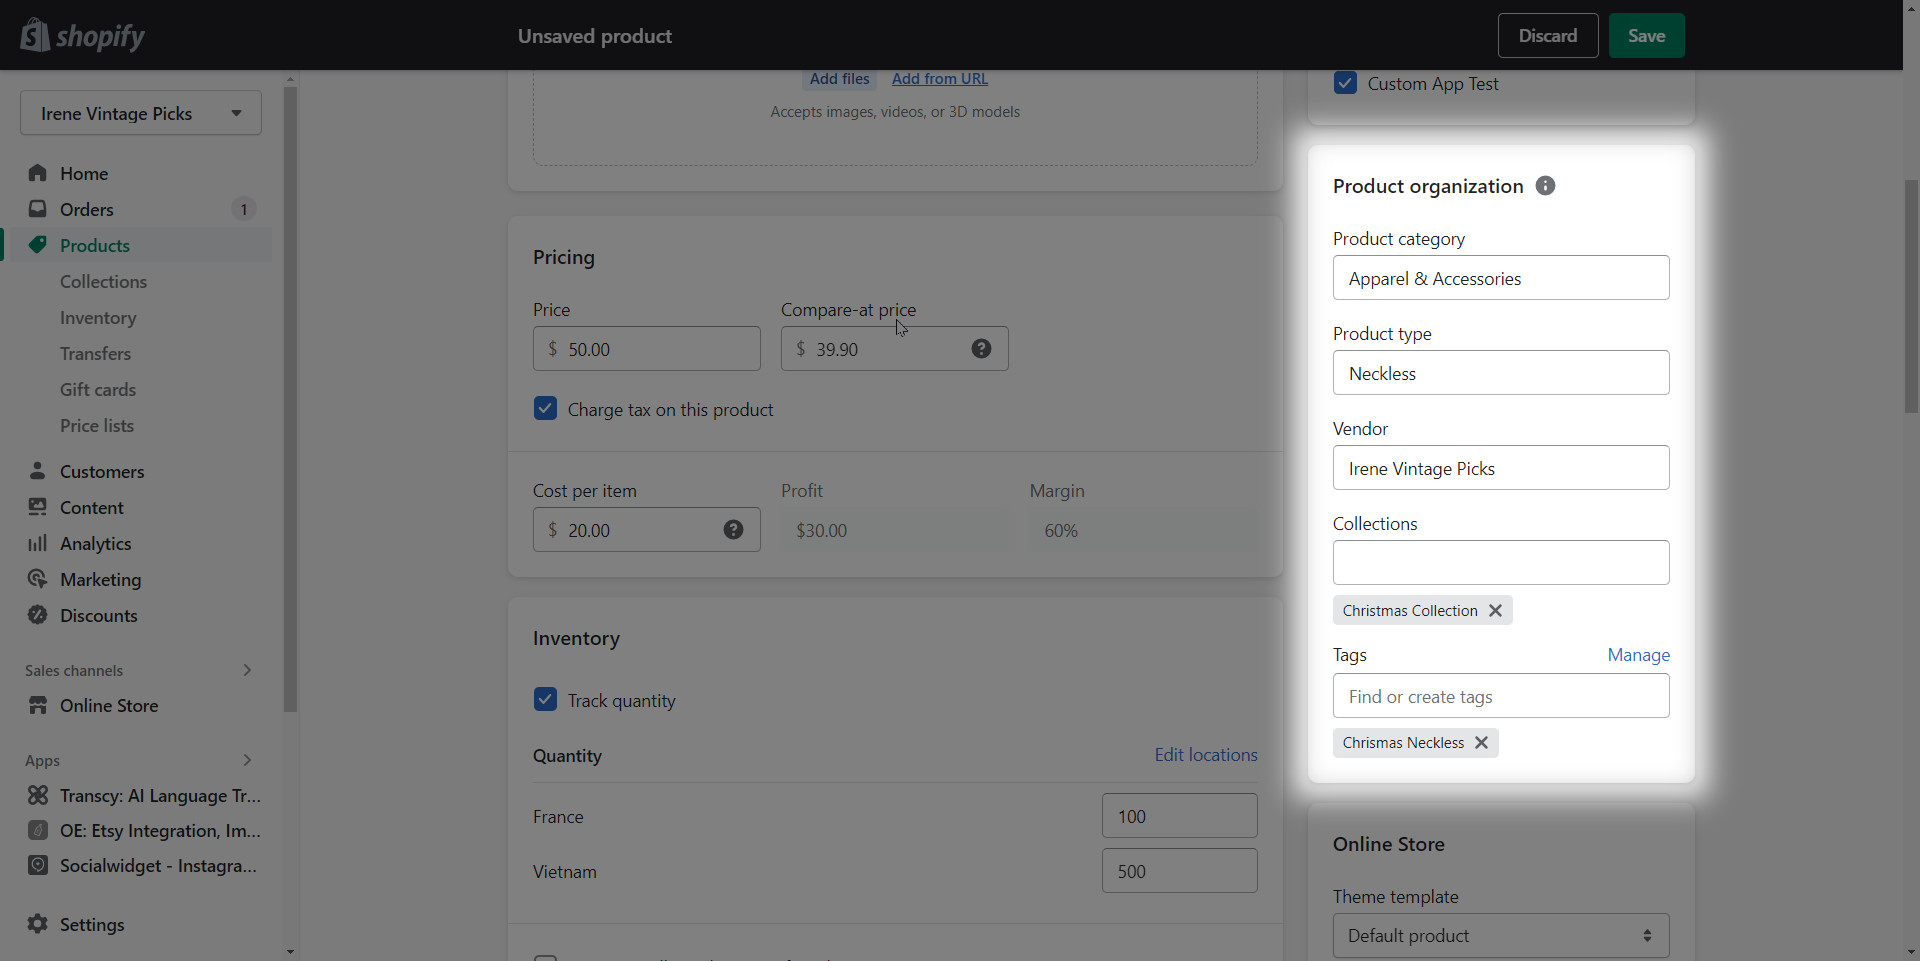
You can place your product page into any relevant category in the “Collections” section. For example, you can add some boots to the “footwear” collection.
Besides, you can also add tags to your product, which makes it easier for customers to find and search for products. These tags should include relevant keywords such as the type of product, the material used, and any other relevant words that could help them find your product in minutes.
Moreover, you can also use tags to create automated collections that will automatically add products when they meet certain conditions. From the Collections tab on your admin page, select Automated and choose which conditions your products need to meet. Your store will be populated with the appropriate products for each collection, which makes adding products to your Shopify store a breeze.
Step 6. Edit the Search Engine Listing
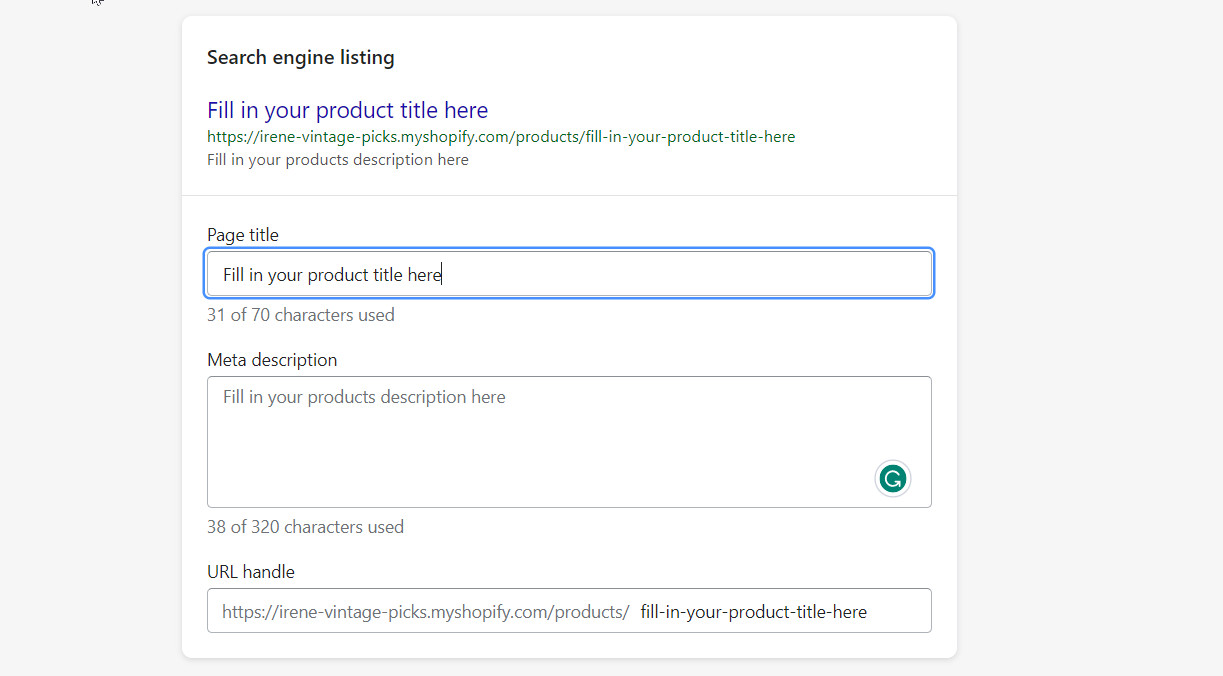
How to add products to Shopify #6 – Edit search engine listing information
Move on to the next step in our how to add products to Shopify tutorial. When editing the search engine listing, consider how you can optimize your product’s visibility. Make sure to include relevant keywords that are related to your product, such as “Alicia Floral Embroidery V-Neck Purple Blouse.” This will help ensure that your product appears in more searches and improves its chances of being seen by potential customers.
Additionally, try to keep the product title to under 70 characters and the description to under 320 characters, as search engines may truncate copy that is longer than this. In other words, you should keep your title short so that your product listing can appear in full in the search engine results.
Once you’ve made changes to the search engine listing, click “Save” to apply them and complete the setup process. You’re now ready to launch your product page and start bringing in customers!
Step 7. Edit Product Status and Organization
Next on how to add products to Shopify, you need to add in the Product Status and Product Organization.
Under “Product status” you can select how you want to list your product on Shopify. In particular, you can set your product status to either “Active” if you are ready for it to appear on your store, or “Draft” if you prefer to store it in your listings first.
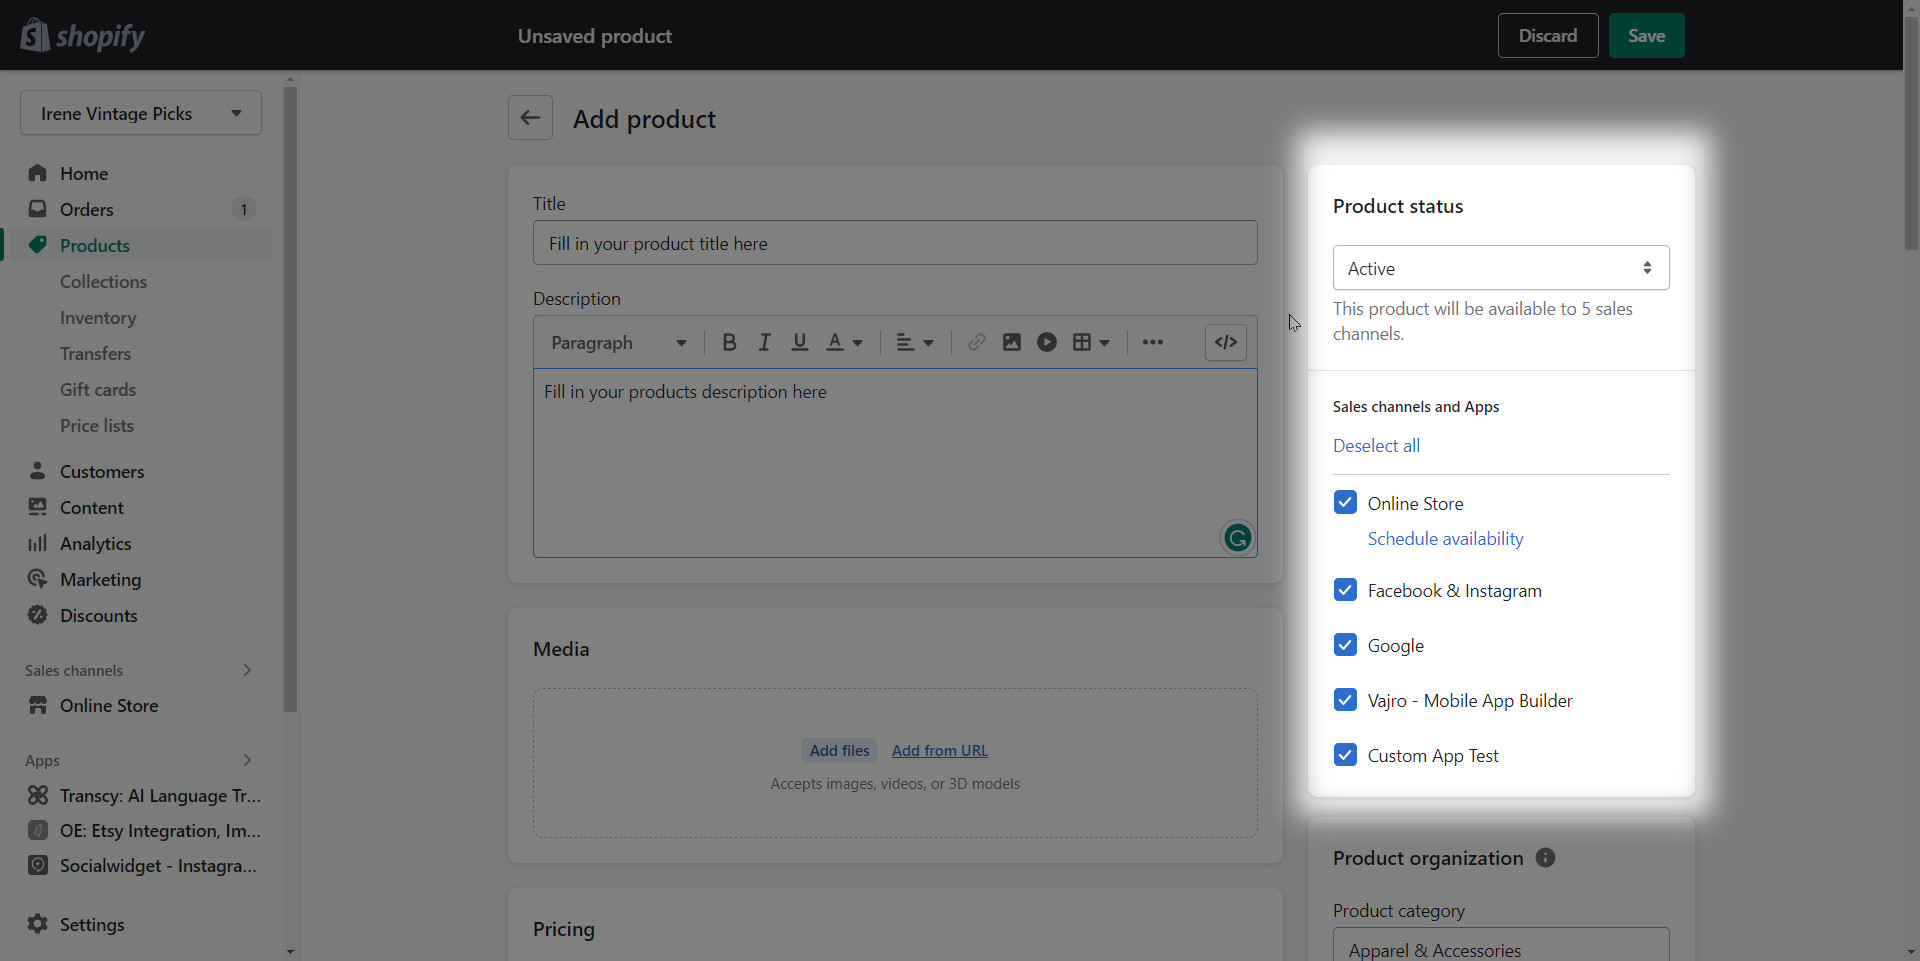
Next step on how to add products to Shopify is to edit the product status
Besides, “Product organization” has four main fields that you need to fill out when adding a product: Type, Vendor, Collections and Tags.
- The “Type” field can only have one product type, which can either be chosen from the available list or created as a custom type.
- The “Vendor” field is the name of the manufacturer or seller of the product. If you create the product yourself, enter your own business name as the vendor. You can also leave it blank if desired.
- The “Collections” field is used to add products directly to a collection. By grouping your products into Shopify collections, you make it easier for customers to find them quickly and easily.
- The “Tags” field allows you to categorize your product with multiple tags that are set up in your store’s settings.
Finally, just click “Save” to complete the process of how to add products to your Shopify store.
Step 8. Publish Your Shopify Product Page

After making a double-check, you can publish your Shopify product page for sales.
You’re now ready to publish your product pages and make them available for customers to view. Click the “Save Product” button in the bottom right of the screen and scroll back up to view how your product page looks. However, as a final check on how to add products to Shopify, click the link saying “View on your website” to make sure everything appears nice for your customers. If you notice any issues or want to make any changes, you can edit your product pages simply by clicking back on the individual product page.
Although you can change any aspect of your product at any time, keep in mind that it may affect how users perceive and engage with the product.
With these steps, you now know how to add products to Shopify and how to create product pages that will draw customers’ attention.
Frequently Asked Question
1. Can I add my own products to Shopify?
Yes, you can easily add your own products to Shopify. To do this, simply log into your Shopify account and go to the Products section of your store. From here, you can click “Add product” and enter all the necessary details for each product (including images, descriptions, pricing, etc.). Once you’re finished adding your products, they will be visible on your Shopify store.
2. Can I add a free product to Shopify?
Yes, you can add free products to Shopify. The process is also like how to add products to Shopify to earn money. However, just need to make sure that your product is set to “free” in the pricing section.
3. How many products does Shopify allow?
Shopify allows merchants to add up to 2,000 products on the platform. If you have more than 2,000 products or complex inventory requirements, you can use Shopify Plus. With this plan, you can have up to an unlimited number of products and more advanced inventory features.
Conclusion
Once you’ve followed the steps outlined in this guide, you should be well on your way to becoming a Shopify pro!
Learning how to add products to Shopify is a great way to get an online store up and running quickly and easily. Setting up product pages properly will help optimize your visibility in search engine results, draw customers into your store, and increase your sales. With a few tips and tricks, you should be able to add products to Shopify more effectively and quickly than ever!
