Table of Contents
Selling services and products through subscriptions has significantly grown on Shopify. You can now make a great amount of money with Shopify subscriptions.
Yet, there was such a big issue with the payment processing of subscriptions that urged Shopify to come up with a new solution called Shopify Subscriptions API.
This tool allows both developers and merchants to create experiences directly with the platform’s native payment gateway – Shopify Checkout, fulfilling their needs and increasing customer satisfaction.
Therefore, if you are a Shopify partner or developer and want to start using this tool, let’s go into the details of what it is and learn how to work with it. Keep scrolling!
Shopify Subscriptions API Understanding
Shopify and Shopify Plus have long made subscriptions available. Yet, merchants had to utilize non-native Shopify’s payment processing options because, at that time, the tokenization system was not applied for subscription payments on Shopify. It was truly challenging for buyers to complete such transactions.

The Shopify Subscription API understanding you need to know
As a result, store owners sought substitutes and chose third-party services. However, the latter frequently fell short of the actual business requirements, including security issues and high costs.
Fortunately, understanding its users’ issues, Shopify has introduced the tools and APIs for building subscription apps native to Shopify Checkout.
1. What are Shopify Subscription APIs?
Shopify rolled out subscription APIs (Application Programming Interfaces), in October 2020, which is a complete and simple toolset for building powerful apps to be used in Shopify’s online stores.
This tool gives its partners and developers the greatest experience possible when designing and developing apps or themes for millions of merchants.
In addition, it allows merchants to create and manage subscriptions, update the items in the subscriptions, and automate billings. For example, the SubBox app can facilitate the management of your subscriptions by letting you control everything on your own portal.
The app also provides a high level of automation, including the option to auto-create orders based on customers’ subscription plans, etc. And there are a lot that can amaze you with this app. Learn more!
You can choose from 3 options, including the Selling Plan API, the Subscription Contract API, and the Customer Payment Method API. Let’s learn more about these selling methods and functionality:
- Selling Plan API: You can use this option to map out the products, variants, and selling plans. In addition to the “buy now” button, you are allowed to offer products through subscriptions. Moreover, you can customize the shipping frequency and create various marketing strategies with product discounts.
- Subscription Contract API: This option will help you to streamline the setup at checkout. It is an effective solution for managing subscription contracts for developers. When a change is made to a subscription (such as a client updating their payment method or subscription items), the developers can update the subscription contract using this API.
- Customer Payment Method API: This API makes it easier for your revenue-generating customer to pay for future orders without the need to go through checkout. They can make a payment quickly without completing all the information like credit card details manually.
2. Users of Shopify Subscriptions API
You can enjoy custom subscription experiences within Shopify Checkout using the Shopify Subscription APIs, whether you are:
- Developers and experts: The Shopify API can be used to create apps that let you profit from sales made via the Shopify store. Additionally, you can integrate it with other software to enhance the versions and stay up-to-date with the ongoing digital transformation.
- Designers: The Shopify APIs allow you to create new visuals and better layout components all inside the same application, as well as multiple themes for the customer’s cart and a user-friendly interface.
- Shopify merchants: You can monitor how well your products or services are selling by using the Shopify Subscriptions API . Besides, you can make the necessary adjustments with the data provided by the APIs.
How the Shopify Subscriptions API works
The Subscriptions API operates with JSON and XML output. There are 4 options for HTTP requests: Get, put, delete, and post. Additionally, some API functions can be used for specific purposes. Based on sections and pricing, the category separates and lists the items in carts.

The customer will specify the section intended for shoppers or consumers, and the ordering process provides or generates a request for the items the customer wants. The accessible commodities, those being offered, and their pricing are listed in the product entity.
There are requirements for certification of individuals qualified to utilize the APIs, which developers and designers should be aware of.
How to apply for access & the app review process
You are now able to apply for access, create your app, and then submit it for review since the Shopify Subscriptions API is open to both public and custom apps.
1. Request access
You must first request access to two protected scopes in order to start creating a subscription app:
- read_customer_payment_methods: Enables your app to read customer payment methods
- write_own_subscription_contracts: Enables your app to read and write subscription contract mutations for contracts they own
Taking this extra step, especially when it comes to customers’ payment methods, enables you to make sure they are being utilized as intended. However, if you have had access to the scopes during the early access period, you will not need to request it again.
Below are the steps to request access to Shopify subscriptions API:
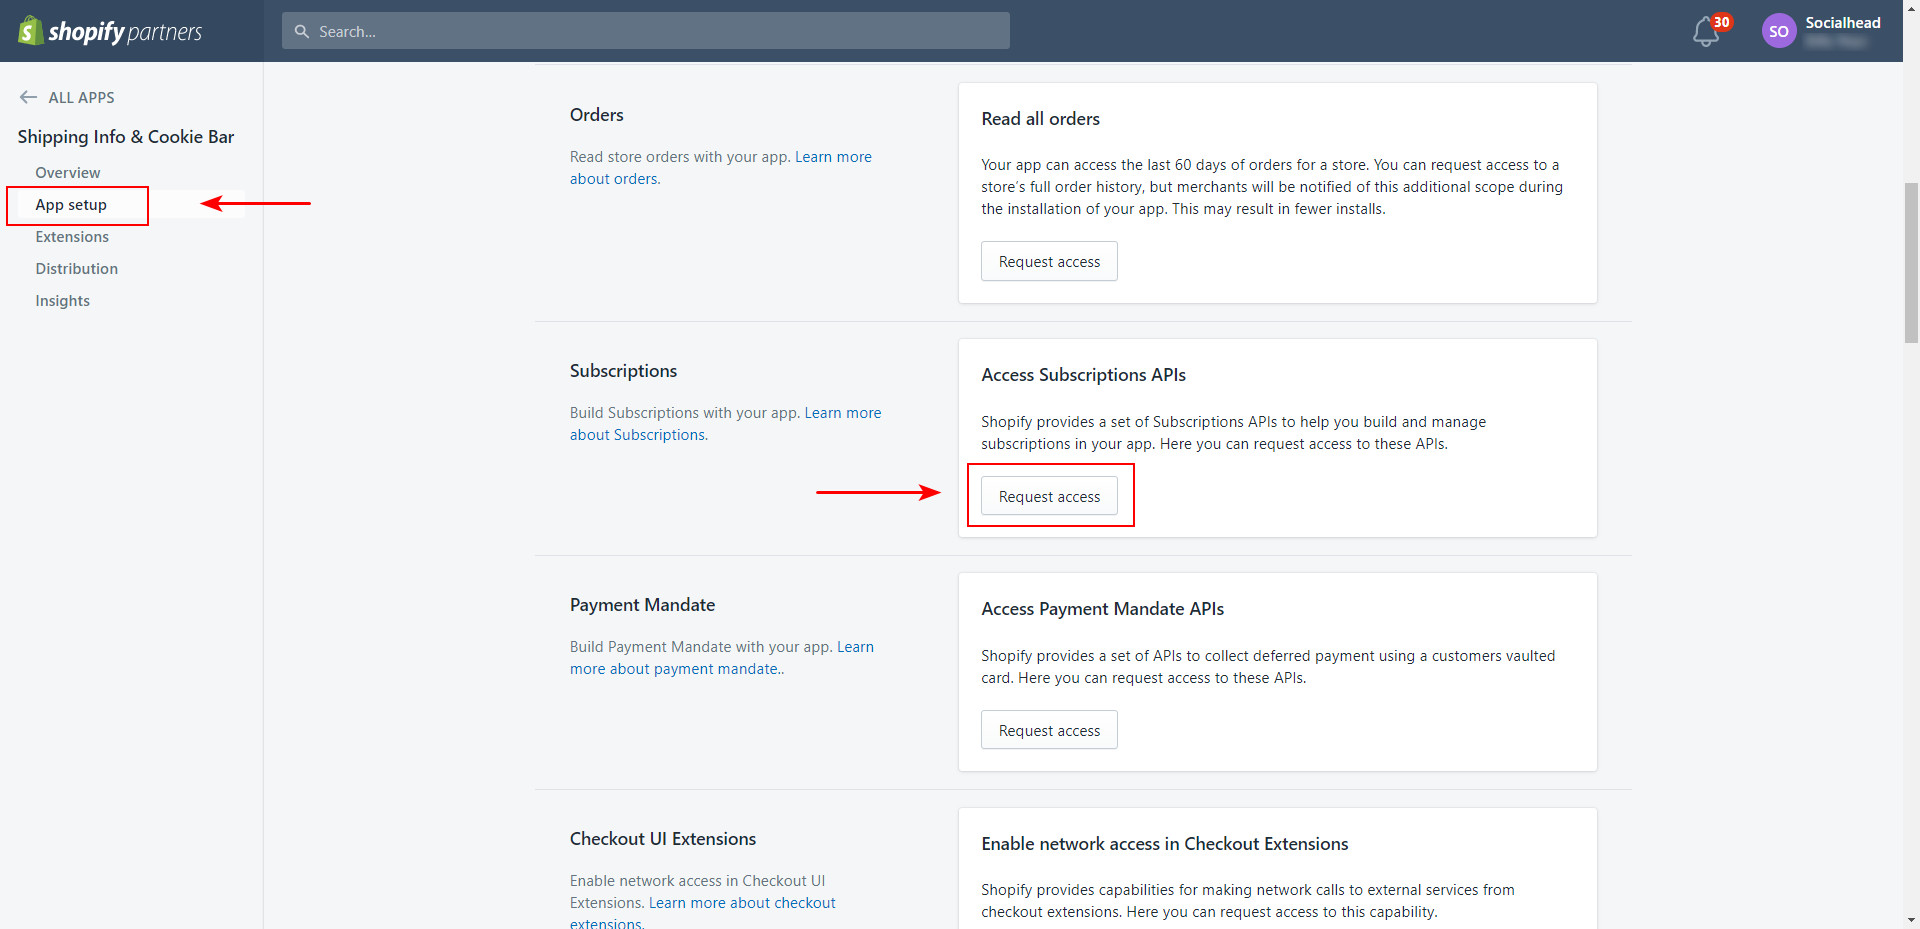
- Step 1: In your app’s overview page in the Partner Dashboard, choose “App setup”.
- Step 2: Choose “Request access to Subscription APIs” in the “Subscriptions” section.
- Step 3: Explain why you are applying for access.
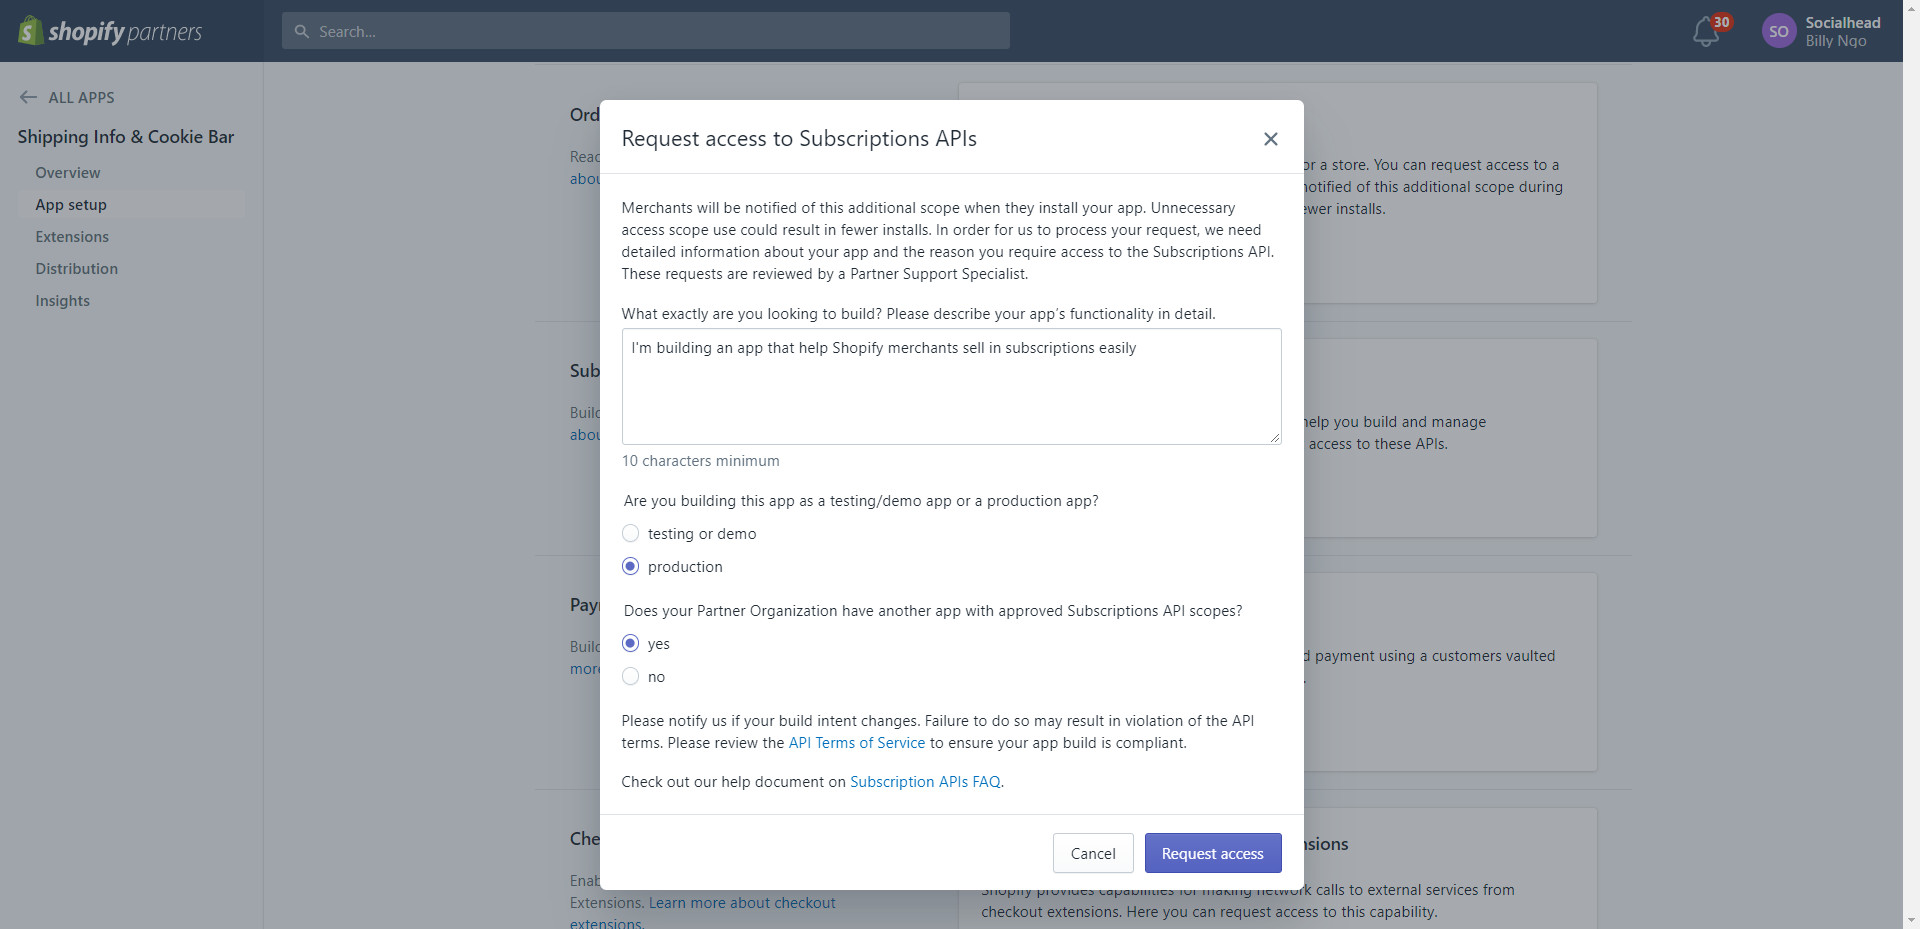
Explain why you are applying for access to Shopify Subscription API
- Step 4: Choose “Request access”.
- Step 5: The Subscriptions section will display that your request is pending approval.
- When it is approved, a “Manage subscriptions” banner will show up.
- When it is denied, a “Request denied” banner will appear with options to get more information or file an appeal against the decision.
2. The app review process
For developers who want their app to be published in the Shopify App Store, you need to learn about the review process which may take up to 10 business days. After that, you can take the following steps to submit your app for approval:
- Step 1: Log in to your Partner Dashboard.
- Step 2: Select “Apps” -> Select the name of your app.
- Step 3: Choose “Distribution”.
- Step 4: If you haven’t already chosen a distribution option, then choose “Shopify App Store” -> Select “Confirm”.
- Step 5: Choose “Create listing” or “Manage listing”.

- Step 6: Choose an existing listing, or tap “Add translated listing”.
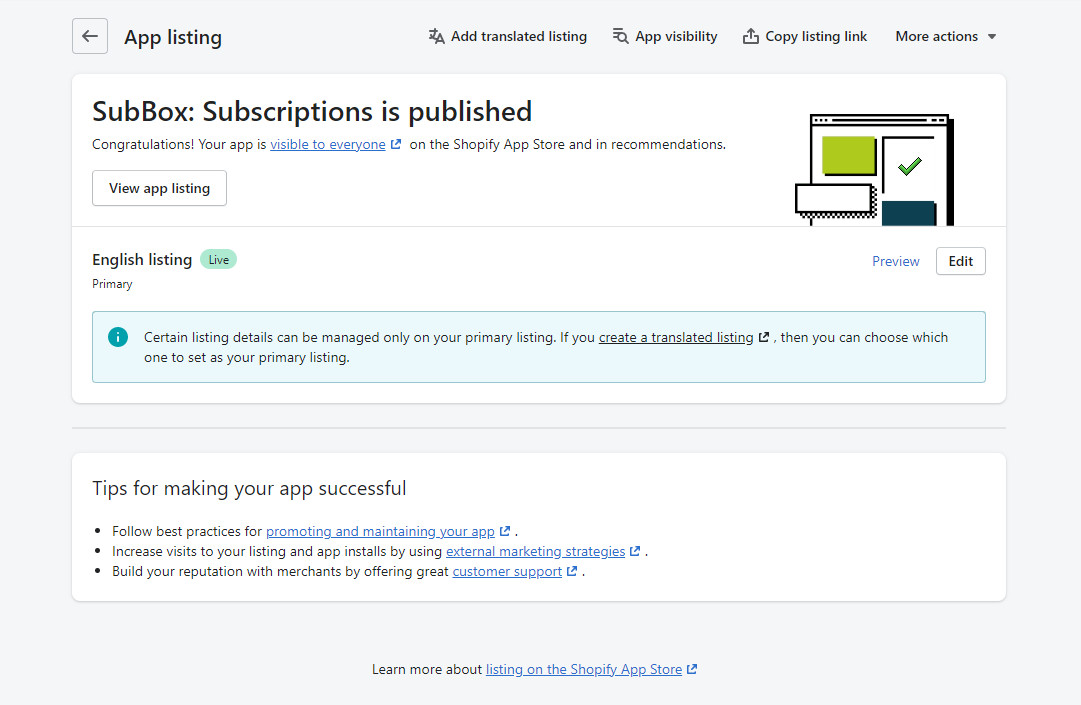
- Step 7: Complete all the required fields, ensuring that you follow the listing guidelines.
- Step 8: Select “Preview listing” to see how your listing will look when it goes live.
- Step 9: Select “Save”.
- Step 10: Tap the back button at the top of the form to go back to the app listing page.
- Step 11: Select “Submit app”.
- Step 12: Tick the checkbox to acknowledge that your app satisfies the submission requirements -> Choose “Submit for review”.
Subscription applications must adhere to specific requirements for the storefront and admin in order to pass in addition to the general requirements.
How to migrate Shopify Subscriptions API for your customers
If you are at this stage, you already have all the information you need to start creating apps with Shopify Subscription APIs. But before you think about what to put in your app, you should learn how to migrate an existing subscription system to one merchants can access directly via the Shopify admin. That will help to improve your customer experience.
1. Migrating to Subscription APIs
This part will detail how to migrate an existing subscription system to one that merchants may access directly in the Shopify admin. There is a set of UX guidelines and requirements for Partners that want to migrate existing merchant subscription data into Shopify.
Step 1: Check merchant’s eligibility for subscriptions
Merchants must meet the qualifying criteria in order to use Shopify subscriptions. To find out if a store qualifies to use the new APIs for subscriptions, you can run the following request using the GraphQL Admin API.

Step 2: Create selling plans and selling plan groups for your subscriptions
Now, you need to create selling plans for your products. Selling plans can then be grouped into selling plan groups that are associated with specific products.
Step 3: Create checkout discount codes
If you are now using discount codes at checkout, you must generate such codes on Shopify. The price rules and discount codes objects can be used to programmatically add to and manage discount codes on subscriptions for your store.
Step 4: Create delivery profiles for shipping
You can use the DeliveryProfile to configure delivery methods on your store. The delivery options and rates that are associated with particular items will be stored in a delivery profile. Delivery profiles allow you to display these shipping options at checkout if your shop sells physical products that must be delivered.
If your app has established subscription-specific delivery settings, you must add these settings to Shopify using DeliveryProfile in order for them to remain accessible at checkout.
Meanwhile, other payment gateways will be the same after the migration.
Step 5: Charging taxes
If your app enables merchants to set custom taxation rules for their subscription items, then these tax rules must be created via the Shopify admin to remain in effect.
Step 6: Add code to the storefront
Customers need to be allowed to buy products as subscriptions from your online store. To do that, you must offer your customers the options of the selling plan purchase from the online store’s product pages.
To generate subscription orders, the Shopify storefront must contain an option to choose a selling plan, and the “add to cart” button must contain the selling plan ID when adding the items to the cart.
You can access all of the selling plan information, including the ID, selling plan group, pricing, and alternatives in the Liquid reference. Or you can make a call to the POST /cart/add.js AJAX API to get information about these selling plans.
2. Migrating existing subscription contracts to Shopify
Shopify has developed a set of tools to import pay-as-you-go contracts into Shopify directly without requiring the migration of credit cards. From the following payment gateways, you can easily import existing subscription contracts into Shopify:
- Stripe
- Braintree
- PayPal Express
- Authorize.net
If Stripe or Braintree is your current payment processor, you will switch to Shopify Payments after the migration.
Each pay-as-you-go contract will be transferred to Shopify, and Stripe or Braintree will be connected as a legacy subscription payment gateway. Then, similar to contracts made through the Shopify checkout, you can use a subscription contract to generate future orders.
To move on to this stage, make sure that you’ve already completed the preceding guide of migrating to Shopify Subscriptions API. Below are the steps you need to take to quickly migrate your existing subscription contracts to Shopify:
Step 1: Configure your payment gateway to work with subscriptions
Depending on the payment gateway you’re using, follow these instructions to set up your payment system to accept subscription payments:
Shopify Payments
- Migrating from Stripe
When switching from Stripe to Shopify Payments, you must connect Stripe as a secondary payment gateway using the Payment Intents API provided by Stripe. The Charges API from Stripe is also compatible with the procedure.
It is important to note that customized charge flows, including particular payment flags, are not supported and may lead to a higher risk of Authorization failures.
In order to add and link the merchant’s current Stripe account as a secondary gateway, follow these steps:
- Step 1: Redirect the merchants to the following URL. You should open this link in a new browser window so that they can go back to your migration page when they finish the process.

- Step 2: To check if Shopify has connected to Stripe successfully, poll the “Shop setting” as follows.

- Migrating from Braintree
If you’re migrating from Braintree to Shopify Payments, you need to add Braintree as a secondary payment gateway via Braintree’s OAuth.
In order to add and link the merchant’s current Braintree account as a secondary gateway, follow these steps:
- Step 1: Redirect the merchants to the following URL:

- Step 2: To check if Shopify has connected to Braintree successfully, poll the “Shop setting” as follows.

| Note: You need to verify that the primary payment gateway of the store is Shopify Payments when setting up Stripe or Braintree as a secondary gateway. |
PayPal Express
If your payment gateway is PayPal Express, make sure it is activated and that the merchant is authorized to use reference transactions from PayPal.
You can poll the “Shop setting” to see if Shopify has properly validated that the PayPal account is ready to be used for subscriptions:

If Shopify is still assessing the merchant’s eligibility, the value is PENDING. However, if the field value is DISABLED, you must contact PayPal through a banner with instructions on the Payments settings page in order to be authorized for reference transactions.
Authorize.net
In case you use Authorize.net as your payment gateway, there are no additional steps to be taken.
Step 2: Import any missing customers’ data
The customer records must be imported in order to link them to payment and subscription options. To add customers to Shopify, utilize the customerCreate and customerUpdate mutations.
First name, last name, and email address are required fields for customer records. These fields are used by Shopify to send emails automatically.
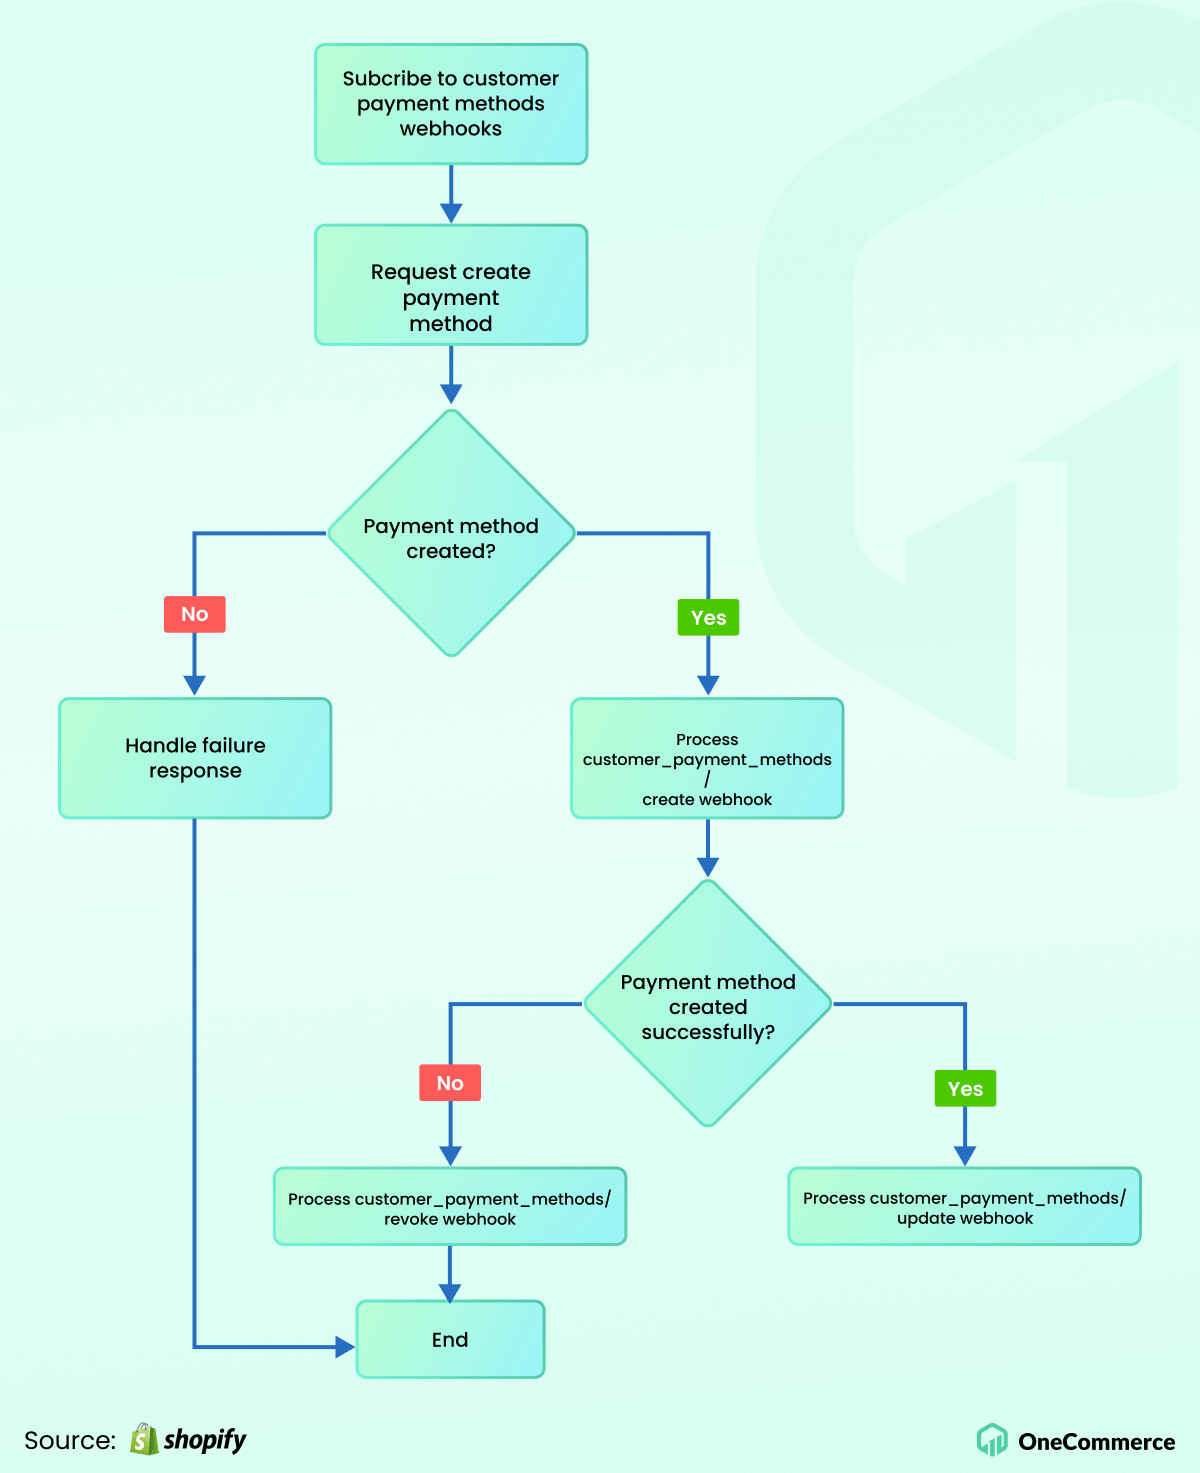
Step 3: Create new payment methods for your customers
Depending on the payment gateway you’re using, you will find out the steps to create new payment options. Yet, here is the quick guide:
Step 4: Import subscription contracts
The subscription contracts can be imported once the Shopify’s customer record has been created or edited. Subscription contracts specify the variant, the plan, the method of payment, and the billing and delivery addresses.
You can follow the steps below to import subscription contracts:
- Step 1: To generate a Subscription Draft, use the SubscriptionContractCreate mutation.
- Step 2: You must add lines to the subscription that correspond to the variants included in the subscription after the draft is made.
- Step 3: After adding lines, you need to carry out a mutation to commit the draft into a live contract.
Step 5: Create billing attempts
To start a contract’s billing schedule, you must create billing attempts. Now, Shopify can create an order after billing attempts are successful.
The Benefits of Shopify Subscriptions API
As Shopify releases further updates, you will be able to simplify your store’s backend operations more with the help of the Shopify Subscription APIs.
- More seamless shopping experience for your customers: You can integrate the subscription options into the native Shopify checkout and they will stay on the same page during the checkout process without any redirection to third parties.
- Cost-efficient solution: You don’t have to pay for third-party apps since you have all the necessary extensions and tools to create your subscription app and integrate it directly into the checkout process.
- Platform compatibility: The Liquid drops and the GraphQL Storefront API can help the subscription app built with Shopify APIs to perfectly fit the style of your Shopify store. Moreover, you can quickly plan your products and don’t need to customize the app substantially.
Shopify Subscriptions API Features
Our API features roundup is meant to help you understand how you can adopt some of the most significant features to enhance the quality of your apps and streamline your development experience.
1. Product filtering in collections using the Storefront API
A collection of items can be easily filtered, which gives you the ability to scale down the search results that buyers see.
You can sort items in a collection based on the vendor, product type, variation choices, price, and if the product is in stock after obtaining the products by the collection they belong to.
You can even combine these filters to find items from a collection that have specific and complex characteristics. Meanwhile, customers can find the most relevant items thanks to this feature.
2. Price List API
With the Price List API, you can establish a set of rules that alter product pricing in response to particular “context rules” regarding the customer’s location. If a pricing list is available for the product and region from which the customer is ordering, the storefront will apply that list’s rules to determine the price.
Price lists are applicable to all countries. They also support fixed prices as well as relative adjusted pricing. With no additional effort required from the seller or a code that the app has to insert, prices can be raised or lowered. The adjustments then go into effect automatically in the online shop and throughout the checkout process.
Price lists, which are all controlled via the API, provide considerably better-grained control over product pricing.
3. Order Invoice API
This new mutation is now available for apps to send invoices for orders via Shopify Subscriptions API. The orderInvoiceSend mutation enables you to send an order ID and email content.
Besides, you can email a customer directly to seek payment for an order that still needs to be paid for. To make it simple for your customer to pay for the order, this email will include a direct link to the checkout.
It is a big plus for merchants who want to automate some processes that were previously carried out manually.
4. Bulk Mutation API error codes
Five granular BulkMutations error codes will provide you a clear understanding of what went wrong in order for you to fix the issues as soon as possible.
The BulkMutationAPI is the quickest and most effective approach to sync data back to Shopify if you need to make more than 10 consecutive API queries.
5. Fetch multiple Translatable resources by ID
It used to take several requests, each of which can only request a single resource, to obtain translatable resources for a given collection of IDs. That is truly time-consuming!
Luckily, retrieving all resources of a certain kind or having to send separate requests for each resource by ID is no longer necessary. Instead, it is now feasible to retrieve a specified list of translatable resources using an array of IDs.
6. Customer Segmentation
Customer Segments is a new feature replacing “Customer Saved Searches” which was previously used for free-text searches across customers.
In other words, a search for “Jackie” can turn up customers named Jackie, residents of a town called Jackie, or individuals with addresses on Jackie streets. Unfortunately, utilizing “Saved Searches” did not allow you to distinguish between these results and essential return customers.
However, customer segments have a greater ability since you can define which customer fields must match in order for a group member to be included. Segments, for instance, could contain the following:
- Customers buying a specific product.
- People from a particular city.
- Customers spending a certain amount of money on the store.
Then, merchants can utilize this data to deliver advertisements to customers in a certain market segment or to find out more about the habits of segment members.
You can use the segmentCreate mutation including a name and the query you want to use to segment customers to create a new segment through the API.
7. Product Taxonomy
The new Product Taxonomy API is the most effective approach to keep items on merchant’s storefronts well-organized and easily-discoverable for customers.
StandardizedProduct Types are predetermined categories of items that can help customers find things on a storefront and make it simpler for merchants to sell their goods on platforms like Facebook, which demands those products fall into specified categories.
It is suggested that you should use the customProductType field on the product object for product kinds that don’t fall within one of the predefined categories.
Moreover, custom product types are strings and can also be combined with a parent StandardizedProductType when a parent category makes sense for the product.
8. Fulfillment Time & Delivery Time
To better understand the fulfillment and shipping expectations for fulfillment orders produced through marketplaces, the Shopify subscriptions API offers you three new fields, including:
- minDeliveryDateTime: The earliest date and time when the delivery is projected to be done.
- maxDeliveryDateTime: The latest date and time when the delivery is projected to be done.
- fulfillBy: The latest date and time when the store owner should fulfill every product in the order to meet the delivery deadlines of the order.
For marketplaces with delivery guarantees, these fields are very crucial. For instance, in order to satisfy customer expectations for delivery, merchants might need to complete certain orders earlier than others.
9. App Subscription Billing Discounts
As a part of the appSubscriptionCreate mutation, you are allowed to use the discount field. With this feature, you can create a mutation to provide a subscription discount for recurring fees. These discounts might be applied to the subscription fee as a flat rate or as a percentage.
This feature is also valid for a predetermined period of payment cycles. For instance, you can give a merchant a 25% discount for 2 billing cycles before adjusting the pricing back to normal.
10. Fulfillment Orders
Fulfillment Orders provides clear states which are easier for both merchants and apps to access.
Whenever a merchant requests a change in fulfillment state for a certain order, Shopify will send requests to a dedicated callback URL. Order fulfillment, order fulfillment cancellation, and order cancellation requests are all examples of these requests.
Additionally, the merchant’s notes will be available in these requests. After that, the fulfillment service provider can decide whether to accept or reject the request and, if necessary, provide a justification.
Furthermore, fulfillment service providers and merchants can communicate and understand one another on a completely new level thanks to Fulfillment Orders.
The fulfillment provider is always questioned about the fulfillment status prior to updating the order. Moreover, the fulfillment state is displayed throughout the lifecycle of the order in the Shopify Admin.
Storefront API product fields
You have two new fields on products thanks to the Storefront API. The first one is the featuredImage field, which enables you to easily and effectively retrieve the featured picture of any product. The second one is the ProductVariant barcode which makes it possible for you to obtain the barcode of any variant.
11. Cart API
With this feature, merchants can use the Storefront API to interact directly with carts. This cart API represents a significant improvement in usability since it helps you to obtain all relevant details on a future order without having to set up a checkout before the buyer is willing to make a purchase.
In addition, these carts respect the same throttling restrictions as any other storefront request and are not bound to the checkout throttle. It is also advantageous for flash sales as it makes the checkout queue accessible for carts built using the Storefront API.
Product Subscription App Extension
The Product Subscription App Extension, complementing the functionality of the Shopify Subscriptions API, presents an interface that enables merchants to create and manage subscriptions in their Shopify admin. Here is the diagram showing how it works.
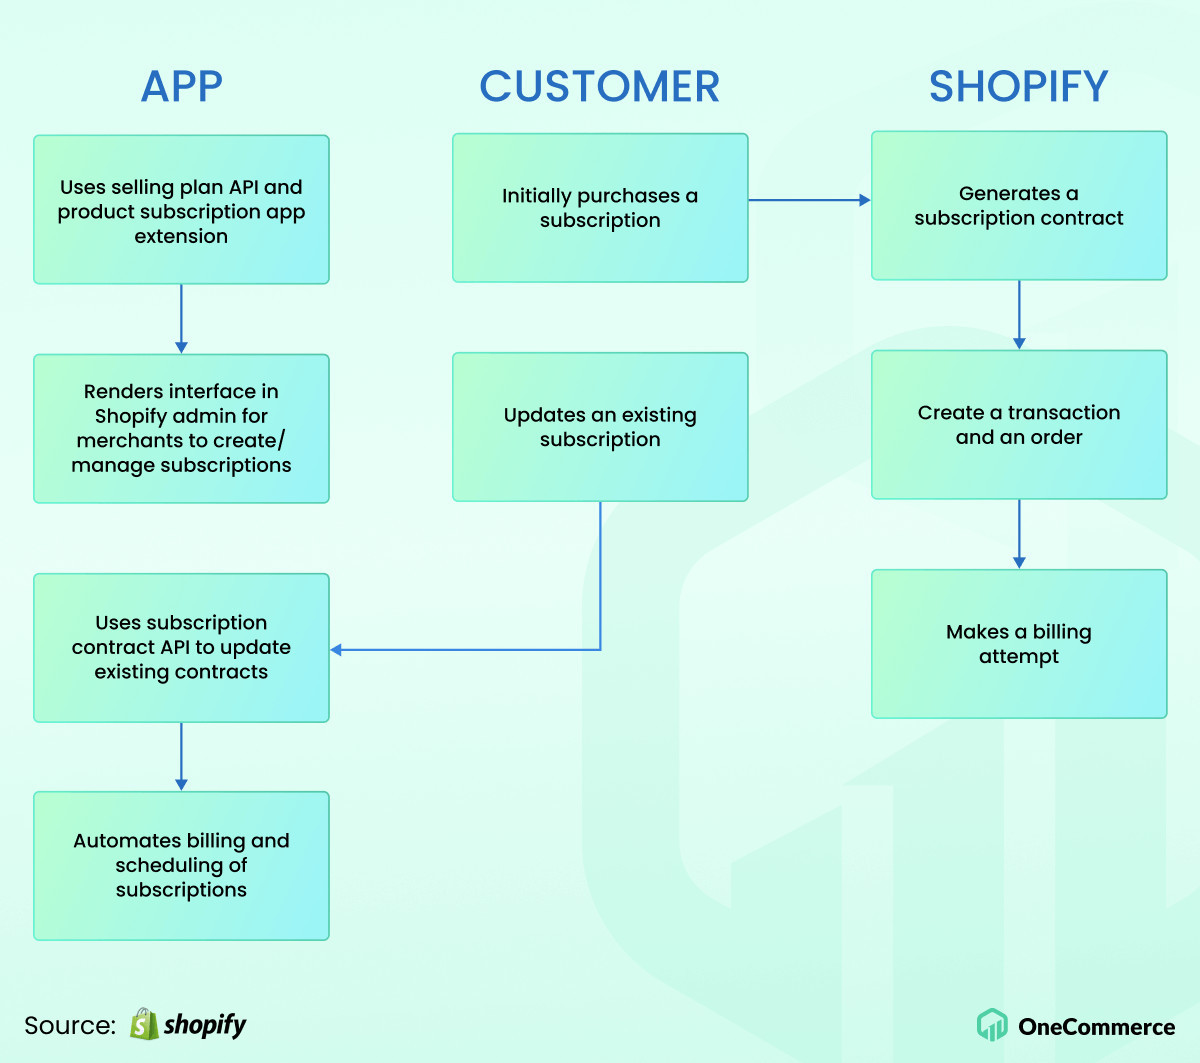
Using the Product Subscription App Extension will make the content from your apps visible to Shopify merchants. That is why they can easily create and manage subscription plans from the admin dashboard.
This is also the first app extension type that utilizes Argo – Shopify’s new app extension technology. With this technology, you can create app extensions with JavaScript or TypeScript to define the functionality of your app and describe its UI.
Shopify will securely host and render your UI on the customer. As a result, the customer benefits from a better user experience without the performance compromises associated with embedded apps.
In summary
Shopify Subscriptions API has come to life with the purpose of creating a seamless experience within the native Shopify payment checkout for developers, merchants, and even shoppers.
For merchants, they can facilitate the payment process for their customers and boost their satisfaction while the customers themselves will be more committed to the brand since their shopping experience has been improved to the maximum.
As a developer, you now have all the tools you need to build your apps that cater to merchants’ needs and increase your income. In this guide, we have shown you how to start working with the Shopify Subscriptions API and how to enhance the quality of your products.
Take time to learn about its outstanding features and how you can apply it to your apps. We hope that our guide will help you a lot in your career path!
